Programming, using and understanding

Pike
Pike
Chapter one is devoted to background information about Pike and this book. It is not really necessary to read this chapter to learn how to use and program Pike, but it might help explain why some things work the way they do. It might be more interesting to re-read the chapter after you have learned the basics of Pike programming. Chapter two is where the action starts. It is a crash course in Pike with examples and explanations of some of the basics. It explains the fundamentals of the Pike data types and control structures. The systematic documentation of all Pike capabilities starts in chapter three with a description of all control structures in Pike. It then continues with all the data types in chapter four and operators in chapter five. Chapter six deals with object orientation in Pike, which is slightly different than what you might be used to.
When µLPC became usable, InformationsVävarna AB started using it for their web-server. Before then, Roxen (then called Spinner) was non-commercial and written in LPC4. Then in 1996 I started working for InformationsVävarna developing µLPC for them. We also changed the name of µLPC to Pike to get a more commercially viable name.
First you need to have Pike installed on your computer. See appendix E "How to install Pike" if this is not already done. It is also vital for the first of the following examples that the Pike binary is in your UNIX search path. If you have problems with this, consult the manual for your shell or go buy a beginners book about UNIX.
Within the function body, programming instructions, statements, are grouped together in blocks. A block is a series of statements placed between curly brackets. Every statement has to end in a semicolon. This group of statements will be executed every time the function is called.{
write("hello world\n");
return 0;
}
The first statement is a call to the builtin function write. This will execute the code in the function write with the arguments as input data. In this case, the constant string hello world\n is sent. Well, not quite. The \n combination corresponds to the newline character. write then writes this string to stdout when executed. Stdout is the standard Unix output channel, usually the screen.write("hello world\n");
This statement exits the function and returns the value zero. Any statements following the return statements will not be executed.return 0;
And then we tell UNIX that hello_world.pike is executable so we can run hello_world.pike without having to bother with running Pike:#!/usr/local/bin/pike
int main()
{
    write("hello world\n");
    return 0;
}
	$ chmod +x hello_world.pike
	$ ./hello_world.pike
	hello world
	$
N.B.: The hash bang (#!) must be first in the file, not even whitespace is allowed to precede it! The file name after the hash bang must also be the complete file name to the Pike binary, and it may not exceed 30 characters.
Let's run it:#!/usr/local/bin/pike
int main(int argc, array(string) argv)
{
if(argc > 1 && argv[1]=="--traditional")
{
write("hello world\n"); // old style
}else{
write("Hello world!\n"); // new style
}
return 0;
}
	$ chmod +x hello_world.pike
	$ ./hello_world.pike
	Hello world!
	$ ./hello_world.pike --traditional
	hello world
	$
What is new in this version, then?
In this version the space between the parenthesis has been filled. What it means is that main now takes two arguments. One is called argc, and is of the type int. The other is called argv and is a an array of strings.int main(int argc, array(string) argv)
The arguments to main are taken from the command line when the Pike program is executed. The first argument, argc, is how many words were written on the command line (including the command itself) and argv is an array formed by these words.
This is an if-else statement, it will execute what's between the first set of brackets if the expression between the parenthesis evaluate to something other than zero. Otherwise what's between the second set of brackets will be executed. Let's look at that expression:if(argc > 1 && argv[1] == "--traditional")
{
write("hello world\n"); // old style
}else{
write("Hello world!\n"); // new style
}
Loosely translated, this means: argc is greater than one, and the second element in the array argv is equal to the string --traditional. Since argc is the number of words on the command line the first part is true only if there was anything after the program invocation.argc > 1 && argv[1] == "--traditional"
Also note the comments:
The // begins a comment which continues to the end of the line. Comments will be ignored by the computer when it reads the code. This allows to inform whoever might read your code (like yourself) of what the program does to make it easier to understand. Comments are also allowed to look like C-style comments, i.e. /* ... */, which can extend over several lines. The // comment only extends to the end of the line.write("hello world\n"); // old style
We have already seen an example of the if statement:
if simply evaluates the expression and if the result is true it executes statement1, otherwise it executes statement2. If you have no need for statement2 you can leave out the whole else part like this:if( expression )
statement1;
else
statement2;
In this case statement1 is evaluated if expression is true, otherwise nothing is evaluated.if( expression )
statement1;
Note for beginners: go back to our first example and make sure you understand what if does.
Another very simple control structure is the while statement:
This statement evaluates expression and if it is found to be true it evaluates statement. After that it starts over and evaluates expression again. This continues until expression is no longer true. This type of control structure is called a loop and is fundamental to all interesting programming.while( expression )
statement;
The modifiers are optional. See section 6.8 "Modifiers" for more details about modifiers. The type specifies what kind of data the function returns. For example, the word int would signify that the function returns an integer number. The name is used to identify the function when calling it. The names between the parenthesis are the arguments to the function. They will be defined as local variables inside the function. Each variable will be declared to contain values of the preceding type. The three dots signifies that you can have anything from zero to 256 arguments to a function. The statements between the brackets are the function body. Those statements will be executed whenever the function is called.modifiers type name(type varname1, type varname2, ...)
{
statements
}
Example:
This line defines a function called sqr to take one argument of the type int and also returns an int. The code itself returns the argument multiplied by itself. To call this function from somewhere in the code you could simply put: sqr(17) and that would return the integer value 289.int sqr(int x) { return x*x; }
As the example above shows, return is used to specify the return value of a function. The value after return must be of the type specified before the function name. If the function is specified to return void, nothing at all should be written after return. Note that when a return statement is executed, the function will finish immediately. Any statements following the return will be ignored.
There are many more control structures, they will all be described in a later chapter devoted only to control structures.
Or, if you have already created an array, you can change the values in the array like this:arr=({1,2,3});
This sets entry number ind in the array arr to data. ind must be an integer. The first index of an array is 0 (zero). A negative index will count from the end of the array rather than from the beginning, -1 being the last element. To declare that a variable is an array we simply type array in front of the variable name we want:arr [ ind ] = data;
We can also declare several array variables on the same line:array i;
If we want to specify that the variable should hold an array of strings, we would write:array i, j;
array (string) i;
| \n | newline |
| \r | carriage return |
| \t | tab |
| \b | backspace |
| \" | " (quotation character) |
| \\ | \ (literal backslash) |
You can also set that data by writing map["five"]="good". If you try to set an index in a mapping that isn't already present in the mapping it will be added as well.mapping(string:string) map=(["five":"good", "ten":"excellent"]);
We want to be able to get a simple list of the records in our database. The function list_records just goes through the mapping records and puts the indices, i.e. the record names, in an array of strings, record_names. By using the builtin function sort we put the record names into the array in alphabetical order which might be a nice touch. For the printout we just print a header, "Records:", followed by a newline. Then we use the loop control structure for to traverse the array and print every item in it, including the number of the record, by counting up from zero to the last item of the array. The builtin function sizeof gives the number of items in an array. The printout is formatted through the use of sprintf which works more or less like the C function of the same name.#!/usr/local/bin/pike
mapping (string:array(string)) records =
([
"Star Wars Trilogy" : ({
"Fox Fanfare",
"Main Title",
"Princess Leia's Theme",
"Here They Come",
"The Asteroid Field",
"Yoda's Theme",
"The Imperial March",
"Parade of the Ewoks",
"Luke and Leia",
"Fight with Tie Fighters",
"Jabba the Hut",
"Darth Vader's Death",
"The Forest Battle",
"Finale"
})
]);
If the command line contained a number our program will find the record of that number and print its name along with the songs of this record. First we create the same array of record names as in the previous function, then we find the name of the record whose number (num) we gave as an argument to this function. Next we put the songs of this record in the array songs and print the record name followed by the songs, each song on a separate line.void list_records()
{
int i;
array (string) record_names=sort(indices(records));
write("Records:\n");
for(i=0;i<sizeof(record_names);i++)
write(sprintf("%3d: %s\n", i+1, record_names[i]));
}
The main function doesn't do much; it checks whether there was anything on the command line after the invocation. If this is not the case it calls the list_records function, otherwise it sends the given argument to the show_record function. When the called function is done the program just quits.void show_record(int num)
{
int i;
array (string) record_names = sort(indices (records));
string name=record_names[num-1];
array (string) songs=records[name];
write(sprintf("Record %d, %s\n",num,name));
for(i=0;i<sizeof(songs);i++)
write(sprintf("%3d: %s\n", i+1, songs[i]));
}
int main(int argc, array (string) argv)
{
if(argc <= 1)
{
list_records();
} else {
show_record((int) argv[1]);
}
}
2.1.1 add_record()
Using the method Stdio.Readline()->read() we wait for input which will be put into the variable record_name. The argument to ->read() is printed as a prompt in front of the user's input. Readline takes everything up to a newline character.
Now we use the control structure while to check whether we should continue inputting songs.
The while(1) means "loop forever", because 1 is always true.
This program does not in fact loop forever, because it uses return
to exit the function from within the loop when you type a period.
When something has been read into the variable song it is checked.
If it is a "." we return a null value that will be used in the while statement to indicate that it is not ok to continue asking for song names.
If it is not a dot, the string will be added to the array of songs for this record, unless it's an empty string.
Note the += operator. It is the same as saying
records[record_name]=records[record_name]+({song}).
void add_record()
{
string record_name=Stdio.Readline()->read("Record name: ");
records[record_name]=({});
write("Input song names, one per line. End with '.' on its own line.\n");
while(1)
{
string song;
song=Stdio.Readline()->read(sprintf("Song %2d: ",
sizeof(records[record_name])+1));
if(song==".")
return;
if (strlen(song))
records[record_name]+=({song});
}
}2.1.2 main()
The main function now does not care about any command line arguments.
Instead we use Stdio.Readline()->read() to prompt the user for instructions
and arguments. The available instructions are "add", "list" and "quit".
What you enter into the variables cmd and args is checked in the
switch() block. If you enter something that is not covered
in any of the case statements the program just silently ignores it and
asks for a new command.
In a switch() the argument (in this case cmd) is checked in the case statements. The first case where the expression equals cmd then executes the statement after the colon. If no expression is equal, we just fall through without any action.
The only command that takes an argument is "list" which works as in the first version of the program.
If "list" receives an argument, that record is shown along with all the songs
on it. If there is no argument it shows a list of the records in the database.
When the program returns from either of the listing functions, the break instruction tells the program to jump out of the switch() block.
"add" of course turns control over to the function described above.
If the command given is "quit" the exit(0) statement stops the execution of the program and returns 0 (zero) to the operating system, telling it that everything was ok.
int main(int argc, array(string) argv)
{
string cmd;
while(cmd=Stdio.Readline()->read("Command: "))
{
string args;
sscanf(cmd,"%s %s",cmd,args);
switch(cmd)
{
case "list":
if((int)args)
{
show_record((int)args);
} else {
list_records();
}
break;
case "quit":
exit(0);
case "add":
add_record();
break;
}
}
}
2.2.1 save()
First we clone a Stdio.File program to the object o.
Then we use it to open the file whose name is given in the string file_name for writing.
We use the fact that if there is an error during opening, open() will return a false value which we can detect and act upon by exiting.
The arrow operator (->) is what you use to access methods and variables in an object.
If there is no error we use yet another control structure, foreach, to go through the mapping records one record at a time.
We precede record names with the string "Record: " and song names with "Song: ".
We also put every entry, be it song or record, on its own line by adding a newline to everything we write to the file.
Finally, remember to close the file.
void save(string file_name)
{
string name, song;
Stdio.File o=Stdio.File();
if(!o->open(file_name,"wct"))
{
write("Failed to open file.\n");
return;
}
foreach(indices(records),name)
{
o->write("Record: "+name+"\n");
foreach(records[name],song)
o->write("Song: "+song+"\n");
}
o->close();
}2.2.2 load()
The load function begins much the same, except we open the file named file for reading instead.
When receiving data from the file we put it in the string file_contents.
The absence of arguments to the method o->read means that the reading should not end until the end of the file.
After having closed the file we initialize our database, i.e. the mapping records. Then we have to put file_contents into the mapping and we do this by splitting the string on newlines (cf. the split operator in Perl) using the division operator. Yes, that's right: by dividing one string with another we can obtain an array consisting of parts from the first. And by using a foreach statement we can take the string file_contents apart piece by piece, putting each piece back in its proper place in the mapping records.
void load(string file_name)
{
string name="ERROR";
string file_contents,line;
Stdio.File o=Stdio.File();
if(!o->open(file_name,"r"))
{
write("Failed to open file.\n");
return;
}
file_contents=o->read();
o->close();
records=([]);
foreach(file_contents/"\n",line)
{
string cmd, arg;
if(sscanf(line,"%s: %s",cmd,arg))
{
switch(lower_case(cmd))
{
case "record":
name=arg;
records[name]=({});
break;
case "song":
records[name]+=({arg});
break;
}
}
}
}2.2.3 main() revisited
main() remains almost unchanged, except for the addition of two case statements with which we now can call the load and save functions. Note that you must provide a filename to load and save, respectively, otherwise they will return an error which will crash the program.
case "save":
save(args);
break;
case "load":
load(args);
break;
2.3.1 delete()
If you sell one of your records it might be nice to able to delete that entry from the database. The delete function is quite simple.
First we set up an array of record names (cf. the list_records function).
Then we find the name of the record of the number num and use the builtin function m_delete() to remove that entry from records.
void delete_record(int num)
{
array(string) record_names=sort(indices(records));
string name=record_names[num-1];
m_delete(records,name);
}2.3.2 search()
Searching for songs is quite easy too. To count the number of hits we declare the variable hits. Note that it's not necessary to initialize variables, that is done automatically when the variable is declared if you do not do it explicitly. To be able to use the builtin function search(), which searches for the presence of a given string inside another, we put the search string in lowercase and compare it with the lowercase version of every song. The use of search() enables us to search for partial song titles as well.
When a match is found it is immediately written to standard output with the record name followed by the name of the song where the search string was found and a newline.
If there were no hits at all, the function prints out a message saying just that.
void find_song(string title)
{
string name, song;
int hits;
title=lower_case(title);
foreach(indices(records),name)
{
foreach(records[name],song)
{
if(search(lower_case(song), title) != -1)
{
write(name+"; "+song+"\n");
hits++;
}
}
}
if(!hits) write("Not found.\n");
}2.3.3 main() again
Once again main() is left unchanged, except for yet another two case statements used to call the search() and delete functions, respectively. Note that you must provide an argument to delete or it will not work properly.
case "delete":
delete_record((int)args);
break;
case "search":
find_song(args);
break;
|
|
One of the case statements in the above example differs in that it is
a range. In this case, any value between constant3 and
constant4 will cause Pike to jump to statement3. Note
that the ranges are inclusive, so the values constant3 and
constant4 are also valid.
3.1.1 if
The simplest one is called the if statement. It can be written anywhere
where a statement is expected and it looks like this:
if( expression )
    statement1;
else
    statement2;
Please note that there is no semicolon after the parenthesis or after the
else. Step by step, if does the following:
This is actually more or less how the interpreter executes the if statement.
In short, statement1 is executed if expression is true
otherwise statement2 is executed. If you are interested in
having something executed if the expression is false you can drop the
whole else part like this:
If on the other hand you are not interested in evaluating something if the
expression is false you should use the not operator to negate
the true/false value of the expression. See chapter 5 for more information
about the not operator. It would look like this:
if( expression )
    statement1;
Any of the statements here and in the rest of this chapter can
also be a block of statements. A block is a list of statements,
separated by semicolons and enclosed by brackets. Note that you should
never put a semicolon after a block of statements. The example above
would look like this;
if( ! expression )
statement2 ;if ( ! expression )
{
statement;
statement;
statement;
}3.1.2 switch
A more sophisticated condition control structure is the switch
statement.
A switch lets you select one of many choices depending on the value of an
expression and it can look something like this:
As you can see, a switch statement is a bit more complicated than an
if statement. It is still fairly simple however. It starts by evaluating
the expression it then searches all the case statements in the
following block. If one is found to be equal to the value returned by
the expression, Pike will continue executing the code directly following
that case statement. When a break is encountered Pike
will skip the rest of the code in the switch block and continue executing
after the block. Note that it is not strictly necessary to have a break
before the next case statement. If there is no break before the next case
statement Pike will simply continue executing and execute the code after
that case statement as well.
switch ( expression )
{
case constant1:
statement1;
break;
case constant2:
statement2;
break;
case constant3 .. constant4:
statement3;
break;
default:
statement5;
}
The difference in how it works isn't that big either, the statement is executed if the expression is true. Then the expression is evaluated again, and if it is true the statement is executed again. Then it evaluates the expression again and so forth... Here is an example of how it could be used:while ( expression )
statement;
This would call show_record with the values 1, 2, 3 and 4.int e=1;
while(e<5)
{
show_record(e);
e=e+1;
}
For does the following steps:for ( initializer_statement ; expression ; incrementor_expression )
statement ;
for(int e=1; e<5; e=e+1)
show_record(e);
As usual, the statement can also be a block of statements, and then you do not need a semicolon after it. To clarify, this statement executes statement first, and then evaluates the expression. If the expression is true it executes the loop again. For instance, if you want to make a program that lets your modem dial your Internet provider, it could look something like this:do
statement;
while ( expression );
This example assumes you have written something that can communicate with the modem by using the functions write and gets.do {
modem->write("ATDT441-9109\n"); // Dial 441-9109
} while(modem->gets()[..6]] != "CONNECT");
We have already seen an example of foreach in the find_song function in chapter 2. What foreach does is:foreach ( array_expression, variable )
statement ;
array tmp1= array_expression;
for ( tmp2 = 0; tmp2 < sizeof(tmp1); tmp2++ )
{
variable = tmp1 [ tmp2 ];
statement;
}
while(1)
{
string command=Stdio.Readline()->read("> ");
if(command=="quit") break;
do_command(command);
}
This way, do_command will never be called with an empty string as argument.while(1)
{
string command=Stdio.Readline()->read("> ");
if(strlen(command) == 0) continue;
if(command=="quit") break;
do_command(command);
}
This would return the error code 1 to the system when the program is run.#!/usr/local/bin/pike
int main()
{
return 1;
}
|
|
Integers are coded in 2-complement and overflows are silently ignored
by Pike. This means that if your integers are 32-bit and you add 1 to
the number 2147483647 you get the number -2147483648. This works exactly
as in C or C++.
All the arithmetic, bitwise and comparison operators can be used on integers.
Also note these functions:
All the arithmetic and comparison operators can be used on floats.
Also, these functions operates on floats:
You might be surprised to see that individual characters can have values
up to 2ł˛-1 and wonder how much memory that use. Do not worry, Pike
automatically decides the proper amount of memory for a string, so all
strings with character values in the range 0-255 will be stored with
one byte per character. You should also beware that not all functions
can handle strings which are not stored as one byte per character, so
there are some limits to when this feature can be used.
Although strings are a form of arrays, they are immutable. This means that
there is no way to change an individual character within a string without
creating a new string. This may seem strange, but keep in mind that strings
are shared, so if you would change a character in the string "foo",
you would change *all* "foo" everywhere in the program.
However, the Pike compiler will allow you to to write code like you could
change characters within strings, the following code is valid and works:
4.1 Basic types
The basic types are int, float and string.
For you who are accustomed to C or C++, it may seem odd that a string
is a basic type as opposed to an array of char, but it is surprisingly
easy to get used to.
4.1.1 int
Int is short for integer, or integer number. They are normally
32 bit integers, which means that they are in the range -2147483648 to
2147483647. Note that on some machines an int might be larger
than 32 bits. Since they are integers, no decimals are allowed. An integer
constant can be written in several ways:
All of the above represent the number 78. Octal notation means that
each digit is worth 8 times as much as the one after. Hexadecimal notation
means that each digit is worth 16 times as much as the one after.
Hexadecimal notation uses the letters a, b, c, d, e and f to represent the
numbers 10, 11, 12, 13, 14 and 15. The ASCII notation gives the ASCII
value of the character between the single quotes. In this case the character
is N which just happens to be 78 in ASCII.
78 // decimal number
0116 // octal number
0x4e // hexadecimal number
'N' // Ascii character4.1.2 float
Although most programs only use integers, they are unpractical when doing
trigonometric calculations, transformations or anything else where you
need decimals. For this purpose you use float. Floats are normally
32 bit floating point numbers, which means that they can represent very large
and very small numbers, but only with 9 accurate digits. To write a floating
point constant, you just put in the decimals or write it in the exponential
form:
Of course you do not need this many decimals, but it doesn't hurt either.
Usually digits after the ninth digit are ignored, but on some architectures
float might have higher accuracy than that. In the exponential form,
e means "times 10 to the power of", so 1.0e9 is equal to
"1.0 times 10 to the power of 9".
3.14159265358979323846264338327950288419716939937510 // Pi
1.0e9 // A billion
1.0e-9 // A billionth4.1.3 string
A string can be seen as an array of values from 0 to 2ł˛-1.
Usually a string contains text such as a word, a sentence, a page or
even a whole book. But it can also contain parts of a binary file,
compressed data or other binary data. Strings in Pike are shared,
which means that identical strings share the same memory space. This
reduces memory usage very much for most applications and also speeds
up string comparisons. We have already seen how to write a constant
string:
As you can see, any sequence of characters within double quotes is a string.
The backslash character is used to escape characters that are not allowed or
impossible to type. As you can see, \t is the sequence to produce
a tab character, \\ is used when you want one backslash and
\" is used when you want a double quote (") to be a part
of the string instead of ending it.
Also, \XXX where XXX is an
octal number from 0 to 37777777777 or \xXX where XX
is 0 to ffffffff lets you write any character you want in the
string, even null characters. From version 0.6.105, you may also use
\dXXX where XXX is 0 to 2ł˛-1. If you write two constant
strings after each other, they will be concatenated into one string.
"hello world" // hello world
"he" "llo" // hello
"\116" // N (116 is the octal ASCII value for N)
"\t" // A tab character
"\n" // A newline character
"\r" // A carriage return character
"\b" // A backspace character
"\0" // A null character
"\"" // A double quote character
"\\" // A singe backslash
"\x4e" // N (4e is the hexadecimal ASCII value for N)
"\d78" // N (78 is the decimal ACII value for N)
"hello world\116\t\n\r\b\0\"\\" // All of the above
"\xff" // the character 255
"\xffff" // the character 65536
"\xffffff" // the character 16777215
"\116""3" // 'N' followed by a '3'
However, you should be aware that this does in fact create a new string and
it may need to copy the string s to do so. This means that the above
operation can be quite slow for large strings. You have been warned.
Most of the time, you can use replace, sscanf, `/
or some other high-level string operation to avoid having to use the above
construction too much.
string s="hello torld";
s[6]='w';
All the comparison operators plus the operators listed here can be used on strings:
Also, these functions operates on strings:
As you can see, each element in the array can contain any type of value. Indexing and ranges on arrays works just like on strings, except with arrays you can change values inside the array with the index operator. However, there is no way to change the size of the array, so if you want to append values to the end you still have to add it to another array which creates a new array. Figure 4.1 shows how the schematics of an array. As you can see, it is a very simple memory structure.({ }) // Empty array
({ 1 }) // Array containing one element of type int
({ "" }) // Array containing a string
({ "", 1, 3.0 }) // Array of three elements, each of different type

Operators and functions usable with arrays:
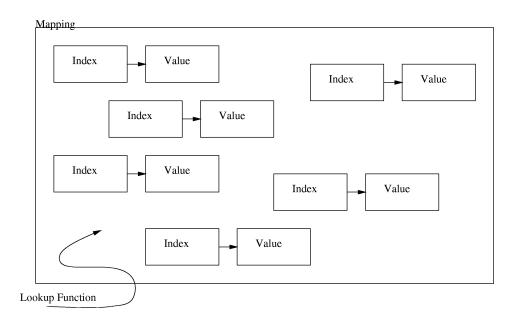
Each index-value pair is floating around freely inside the mapping. There is exactly one value for each index. We also have a (magical) lookup function. This lookup function can find any index in the mapping very quickly. Now, if the mapping is called m and we index it like this: m [ i ] the lookup function will quickly find the index i in the mapping and return the corresponding value. If the index is not found, zero is returned instead. If we on the other hand assign an index in the mapping the value will instead be overwritten with the new value. If the index is not found when assigning, a new index-value pair will be added to the mapping. Writing a constant mapping is easy:
([ ]) // Empty mapping
([ 1:2 ]) // Mapping with one index-value pair, the 1 is the index
([ "one":1, "two":2 ]) // Mapping which maps words to numbers
([ 1:({2.0}), "":([]), ]) // Mapping with lots of different types
As with arrays, mappings can contain any type. The main difference is that the index can be any type too. Also note that the index-value pairs in a mapping are not stored in a specific order. You can not refer to the fourteenth key-index pair, since there is no way of telling which one is the fourteenth. Because of this, you cannot use the range operator on mappings.
The following operators and functions are important:
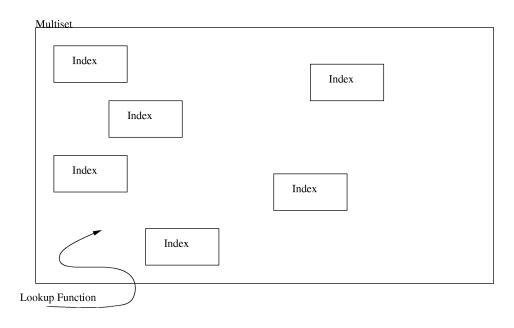
Instead, the index operator will return 1 if the value was found in the multiset and 0 if it was not. When assigning an index to a multiset like this: mset[ ind ] = val the index ind will be added to the multiset mset if val is true. Otherwise ind will be removed from the multiset instead.
Writing a constant multiset is similar to writing an array:
Note that you can actually have more than one of the same index in a multiset. This is normally not used, but can be practical at times.(< >) // Empty multiset
(< 17 >) // Multiset with one index: 17
(< "", 1, 3.0, 1 >) // Multiset with 3 indices
You can also use the cast operator like this:program p = compile_file("hello_world.pike");
This will also load the program hello_world.pike, the only difference is that it will cache the result so that next time you do (program)"hello_world" you will receive the _same_ program. If you call compile_file("hello_world.pike") repeatedly you will get a new program each time.program p = (program) "hello_world";
There is also a way to write programs inside programs with the help of the class keyword:
The class keyword can be written as a separate entity outside of all functions, but it is also an expression which returns the program written between the brackets. The class_name is optional. If used you can later refer to that program by the name class_name. This is very similar to how classes are written in C++ and can be used in much the same way. It can also be used to create structs (or records if you program Pascal). Let's look at an example:class class_name {
inherits, variables and functions
}
This could be a small part of a better record register program. It is not a complete executable program in itself. In this example we create a program called record which has three identifiers. In add_empty_record a new object is created by calling record. This is called cloning and it allocates space to store the variables defined in the class record. Show_record takes one of the records created in add_empty_record and shows the contents of it. As you can see, the arrow operator is used to access the data allocated in add_empty_record. If you do not understand this section I suggest you go on and read the next section about objects and then come back and read this section again.class record {
string title;
string artist;
array(string) songs;
}
array(record) records = ({});
void add_empty_record()
{
records+=({ record() });
}
void show_record(record rec)
{
write("Record name: "+rec->title+"\n");
write("Artist: "+rec->artist+"\n");
write("Songs:\n");
foreach(rec->songs, string song)
write(" "+song+"\n");
}
compile_file simply reads the file given as argument, compiles it and returns the resulting program. compile_string instead compiles whatever is in the string p. The second argument, filename, is only used in debug printouts when an error occurs in the newly made program. Both compile_file and compile_string calls compile to actually compile the string after calling cpp on it.program compile(string p);
program compile_file(string filename);
program compile_string(string p, string filename);
The following operators and functions are important:
Here we can clearly see how the function show prints the contents of the variables in that object. In essence, instead of accessing the data in the object with the -> operator, we call a function in the object and have it write the information itself. This type of programming is very flexible, since we can later change how record stores its data, but we do not have to change anything outside of the record program.class record {
string title;
string artist;
array(string) songs;
void show()
{
write("Record name: "+title+"\n");
write("Artist: "+artist+"\n");
write("Songs:\n");
foreach(songs, string song)
write(" "+song+"\n");
}
}
array(record) records = ({});
void add_empty_record()
{
records+=({ record() });
}
void show_record(object rec)
{
rec->show();
}
Functions and operators relevant to objects:

In this example, the function bar returns a pointer to the function foo. No indexing is necessary since the function foo is located in the same object. The function gazonk simply calls foo. However, note that the word foo in that function is an expression returning a function pointer that is then called. To further illustrate this, foo has been replaced by bar() in the function teleledningsanka.int foo() { return 1; }
function bar() { return foo; }
int gazonk() { return foo(); }
int teleledningsanka() { return bar()(); }
For convenience, there is also a simple way to write a function inside another function. To do this you use the lambda keyword. The syntax is the same as for a normal function, except you write lambda instead of the function name:
The major difference is that this is an expression that can be used inside an other function. Example:lambda ( types ) { statements }
This is the same as the first two lines in the previous example, the keyword lambda allows you to write the function inside bar.function bar() { return lambda() { return 1; }; )
Note that unlike C++ and Java you can not use function overloading in Pike. This means that you cannot have one function called 'foo' which takes an integer argument and another function 'foo' which takes a float argument.
This is what you can do with a function pointer.
This program will of course write Hello world.int main(int argc, array(string) argv)
{
array(string) tmp;
tmp=argv;
argv[0]="Hello world.\n";
write(tmp[0]);
}
Sometimes you want to create a copy of a mapping, array or object. To do so you simply call copy_value with whatever you want to copy as argument. Copy_value is recursive, which means that if you have an array containing arrays, copies will be made of all those arrays.
If you don't want to copy recursively, or you know you don't have to copy recursively, you can use the plus operator instead. For instance, to create a copy of an array you simply add an empty array to it, like this: copy_of_arr = arr + ({}); If you need to copy a mapping you use an empty mapping, and for a multiset you use an empty multiset.
As you can see there are some interesting ways to specify types. Here is a list of what is possible:int x; // x is an integer
int|string x; // x is a string or an integer
array(string) x; // x is an array of strings
array x; // x is an array of mixed
mixed x; // x can be any type
string *x; // x is an array of strings
// x is a mapping from int to string
mapping(string:int) x;
// x implements Stdio.File
Stdio.File x;
// x implements Stdio.File
object(Stdio.File) x;
// x is a function that takes two integer
// arguments and returns a string
function(int,int:string) x;
// x is a function taking any amount of
// integer arguments and returns nothing.
function(int...:void) x;
// x is ... complicated
mapping(string:function(string|int...:mapping(string:array(string)))) x;
|
The third column, "Identifier" is the name of the function that actually evaluates the operation. For instance, a + b can also be written as `+(a, b). I will show you how useful this can be at the end of this chapter.
When applied to integers or floats these operators do exactly what they are supposed to do. The only operator in the list not known from basic math is the modulo operator. The modulo operator returns the remainder from an integer division. It is the same as calculating a - floor(a / b) * b. floor rounds the value down to closest lower integer value. Note that the call to floor isn't needed when operating on integers, since dividing two integers will return the result as an integer and it is always rounded down. For instance, 8 / 3 would return 2.
If all arguments to the operator are integers, the result will also be an integer. If one is a float and the other is an integer, the result will be a float. If both arguments are float, the result will of course be a float.
However, there are more types in Pike than integers and floats. Here is the complete list of combinations of types you can use with these operators:
|
|
The other operators in the table above can only be used with integers, floats and strings. If you compare an integer with a float, the int will be promoted to a float before the comparison. When comparing strings, lexical order is used and the values of the environment variables LC_CTYPE and LC_LANG are respected.
|
|
When intersection, union or symmetric difference is used on an array each element in the array is considered by itself. So intersecting two arrays will result in an array with all elements that are present in both arrays. Example: ({7,6,4,3,2,1}) & ({1, 23, 5, 4, 7}) will return ({7,4,1}). The order of the elements in the returned array will always be taken from the left array. Elements in multisets are treated the same as elements in arrays. When doing a set operation on a mapping however, only the indices are considered. The values are just copied with the indices. If a particular index is present in both the right and left argument to a set operator, the one from the right side will be used. Example: ([1:2]) | ([1:3]) will return ([1:3]).
|
|
When indexing an array or string it is sometimes convenient to access index from the end instead of from the beginning. This function can be performed by using a negative index. Thus arr[-i] is the same as arr[sizeof(arr)-i]. Note however that this behavior does not apply to the range operator. Instead the range operator clamps it's arguments to a suitable range. This means that a[b..c] will be treated as follows:
The variable can be a local variable, a global variable or an index in an array, object, multiset or mapping. This will of course set the value stored in variable to expression. Note that the above is also an expression which returns the value of the expression. This can be used in some interesting ways:variable = expression;
Using assignments like this can however be confusing to novice users, or users who come from a Pascal or Basic background. Especially the if statement can be mistaken for if(variable == expression) which would mean something completely different. As I mentioned earlier, the assignment operator can be combined with another operator to form operators that modify the contents of a variable instead of just assigning it. Here is a list of all the combinations:variable1 = variable2 = 1; // Assign 1 to both variables
variable1 =(variable2 = 1); // Same as above
// Write the value of the expression, if any
if(variable = expression)
write(variable);
|
|
object clone(mixed p, mixed ... args) { ( (program)p )(@args); }
On the subject of function calls, the splice operator should also be mentioned. The splice operator is an at sign in front of an expression. The expression should always be an array. The splice operator sends each of the elements in the array as a separate argument to the function call. The splice operator can only be used in an argument list for a function call.
Then there are the increment and decrement operators. The increment and decrement operators are somewhat limited: they can only be used on integers. They provide a short and fast way to add or subtract one to an integer. If the operator is written before the variable (++a) the returned value will be what the variable is after the operator has added/subtracted one to it. If the operator is after the variable (a++) it will instead return the value of the variable before it was incremented/decremented.
Last, and in some respect least, is the comma operator. It doesn't do much. In fact, it simply evaluates the two arguments and then returns the right hand one. This operator is mostly useful to produce smaller code, or to make defines that can be used in expressions.
Examples:
|
This analogy has one major flaw, when running programs in UNIX they actually run simultaneously. UNIX is multitasking, Pike is not. When one object is executing code, all the other objects has to wait until they are called. An exception is if you are using threads as will be discussed in a later chapter.
In my experience, the advantages of object oriented programming are:
Similarly, if you want to load another file and call functions in it, you can do it with compile_file(), or you can use the cast operator and cast the filename to a string. You can also use the module system, which we will discuss further in the next chapter.program scriptclass=compile_file(argv[0]); // Load script
object script=scriptclass(); // clone script
int ret=script->main(sizeof(argv), argv); // call main()
If you don't want to put each program in a separate file, you can use the class keyword to write all your classes in one file. We have already seen an example how this in chapter 4 "Data types", but let's go over it in more detail. The syntax looks like this:
This construction can be used almost anywhere within a normal program. It can be used outside all functions, but it can also be used as an expression in which case the defined class will be returned. In this case you may also leave out the class_name and leave the class unnamed. The class definition is simply the functions and programs you want to add to the class.class class_name {
class_definition
}
To make it easier to program, defining a class is also to define a constant with that name. Essentially, these two lines of code do the same thing:
Because classes are defined as constants, it is possible to use a class defined inside classes you define later, like this:class foo {};
constant foo = class {};
class foo
{
int test() { return 17; }
};
class bar
{
program test2() { return foo; }
};
What inherit does is that it copies all the variables and functions from the inherited program into the current one. You can then re-define any function or variable you want, and you can call the original one by using a :: in front of the function name. The argument to inherit can be one of the following:inherit "hello_world";
int main(int argc, array(string) argv)
{
write("Hello world version 1.0\n");
return ::main(argc,argv);
}
Let's look at an example. We'll split up an earlier example into three parts and let each inherit the previous part. It would look something like this:
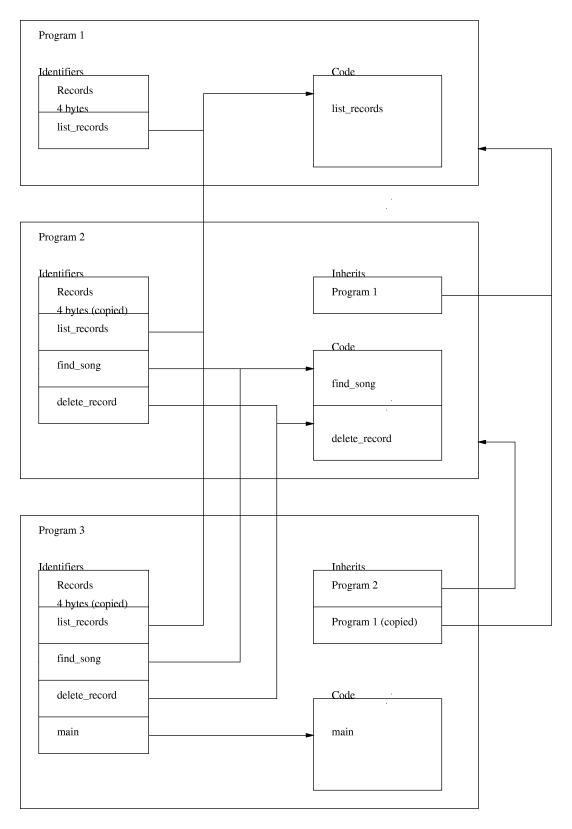
As you can see it would be impossible to separate the different read and main functions without using inherit names. If you tried calling just read without any :: or inherit name in front of it Pike will call the last read defined, in this case it will call read in the fourth inherit.inherit Stdio.File; // This inherit is named File
inherit Stdio.FILE; // This inherit is named FILE
inherit "hello_word"; // This inherit is named hello_world
inherit Stdio.File : test1; // This inherit is named test1
inherit "hello_world" : test2; // This inherit is named test2
void test()
{
File::read(); // Read data from the first inherit
FILE::read(); // Read data from the second inherit
hello_world::main(0,({})); // Call main in the third inherit
test1::read(); // Read data from the fourth inherit
test2::main(0,({})); // Call main in the fifth inherit
::read(); // Read data from all inherits
}
If you leave the inherit name blank and just call ::read Pike will call all inherited read() functions. If there is more than one inherited read function the results will be returned in an array.
Let's look at another example:
This short piece of code works a lot like the UNIX command cat. It reads all the files given on the command line and writes them to stdout. As an example, I have inherited Stdio.File twice to show you that both files are usable from my program.#!/usr/local/bin/pike
inherit Stdio.File : input;
inherit Stdio.File : output;
int main(int argc, array(string) argv)
{
output::create("stdout");
for(int e=1;e<sizeof(argv);e++)
{
input::open(argv[e],"r");
while(output::write(input::read(4096)) == 4096);
}
}
The following table assumes that a and b are objects and shows what will be evaluated if you use that particular operation on an object. Note that some of these operators, notably == and ! have default behavior which will be used if the corresponding method is not defined in the object. Other operators will simply fail if called with objects. Refer to chapter 5 "Operators" for information on which operators can operate on objects without operator overloading.
|
Here is a really silly example of a program that will write 10 to stdout when executed.
It is important to know that some optimizations are still performed even when operator overloading is in effect. If you define a multiplication operator and multiply your object with one, you should not be surprised if the multiplication operator is never called. This might not always be what you expect, in which case you are better off not using operator overloading.#!/usr/local/bin/pike
class three {
int `+(int foo) { return 3+foo; }
};
int main()
{
write(sprintf("%d\n",three()+7));
}
void find_song(string title) |
The string str will be matched against the format string fmt. fmt can contain strings separated by %d,%s,%c and %f. Every % corresponds to one lvalue. An lvalue is the name of a variable, a name of a local variable, an index in an array, mapping or object. It is because of these lvalues that sscanf can not be implemented as a normal function.int sscanf(string str, string fmt, lvalue ...)
Whenever a percent is found in the format string, a match is according to the following table:
| %b | reads a binary integer |
| %d | reads a decimal integer |
| %o | reads an octal integer |
| %x | reads a hexadecimal integer |
| %D | reads an integer that is either octal (leading zero), hexadecimal (leading 0x) or decimal. |
| %f | reads a float |
| %c | matches one char and returns it as an integer |
| %2c | matches two chars and returns them as an integer (short) |
| %4F | matches four chars and returns them as a float (IEEE single precision) |
| %8F | matches eigth chars and returns them as a float (IEEE double precision) |
| %s | reads a string. If followed by %d, %s will read any non-numerical characters. If followed by a %[], %s will read any characters not present in the set. If followed by normal text, %s will match all characters up to but not including the first occurrence of that text. |
| %5s | gives a string of 5 characters (5 can be any number) |
| %[set] | matches a string containing a given set of characters (those given inside the brackets). %[^set] means any character except those inside brackets. Example: %[0-9H] means any number or 'H'. |
| %{format%} | Repeatedly matches 'format' as many times as possible and assigns an array of arrays with the results to the lvalue. |
If a * is put between the percent and the operator, the operator will only match its argument, not assign any variables.
Sscanf does not use backtracking. Sscanf simply looks at the format string up to the next % and tries to match that with the string. It then proceeds to look at the next part. If a part does not match, sscanf immediately returns how many % were matched. If this happens, the lvalues for % that were not matched will not be changed.
Let's look at a couple of examples:
// a will be assigned "oo" and 1 will be returned
sscanf("foo","f%s",a);
// a will be 4711 and b will be "bar", 2 will be returned
sscanf("4711bar","%d%s",a,b);
// a will become "test"
sscanf(" \t test","%*[ \t]%s",a)
// Remove "the " from the beginning of a string
// If 'str' does not begin with "the " it will not be changed
sscanf(str,"the %s",str);
SEE ALSO : sprintf
If an error occurs, catch will return a description of the error. The description of the error has the following format:catch { statements }
If no error occurs, catch will return zero. You may emulate your own errors using the function throw, described in chapter 16 "Builtin functions".({
"error description",
backtrace()
})
Example:
int x,y;
// This might generate "division by zero"
mixed error=catch { x/=y; };
However, gauge simply returns how many seconds the code took to execute. This can be used to find out how fast your code actually is.. :) Only CPU time used by the Pike process is measured. This means that if it takes two seconds to execute but only uses 50 % CPU, this function will return 1.0.gauge { statements }
This will return the string "void" since exit is a function that returns void. It will not execute the function exit and exit the process as you might expect.typeof( exit(1) )
If you want to know the type after evaluation, use sprintf("%t", expr).
here is a list of the basic Pike modules:
* These modules might not be available depending on how Pike was compiled
and whether support for these functions exist on your system.
When you use Stdio Pike will look for that module:
You can also use the . operator without an identifier preceeding it to
access modules in the same directory as the program itself. For instance,
.my_module.foo would mean 'the identifier foo in the module
my_module in this directory.
8.1 How to use modules
A module is a bunch of functions, programs or other modules collected in
one symbol. For instance, the module Stdio contains the objects
stdin, stdout and stderr. To access these objects
you can write Stdio.stdin, Stdio.stdout or
Stdio.stderr anywhere in your program where an object of that type
is acceptable. If you use Stdio a lot you can put
import Stdio; in the beginning of your program. This will import
all the identifiers from the module Stdio into your program, making it
possible to write just stdin instead of Stdio.stdin.
It is also possible to import all modules in a directory with import
by putting the directory name in doublequtes. So, to import all modules in
the current directory, you would use import ".";.
8.2 Where do modules come from?
Modules are not loaded until you use them, which saves memory unless you use
all the modules. However, if you want to write your own modules it is important
to know how modules are located and loaded.
For each of these directories, Pike will do the following:
As you can see, quite a lot of work goes into finding the modules, this
makes it possible to choose the most convenient way to build your own Pike
modules.
8.3 The . operator
The period operator is not really an operator, as it is always evaluated
during the compilation. It works similarly to the index and arrow operators,
but can only be used on constant values such as modules. In most cases,
modules are simply a clone of a program, in which case the identifiers in
the module will be the same as those in the program. But some modules,
like those created from directories, overload the index operator so that
the identifiers in the module can be something other than those in the program.
For directory modules, the index operator looks in the directory it was
cloned for to find the identifiers.
8.4 How to write a module
Here is an example of a simple module:
if we save this short file as Trig.pmod we can now use this
module like this:
constant PI = 3.14159265358979323846264338327950;
float cos2(float f) { return pow(cos(f),2.0); }
or like this:
int main()
{
write(sprintf("%f\n",.Trig.cos2(.Trig.PI));
}import .Trig;
int main()
{
write(sprintf("%f\n",cos2(PI));
}8.5 Simple exercises
|
|
However, instead of cloning and then calling open(), you can clone the File with a filename and open mode. This is the same thing as cloning and then calling open, except shorter and faster. Default open mode is "r" and default mask is 0666.
Alternatively, you can clone a File with "stdin", "stdout" or "stderr" as argument. This will open the specified standard stream.
For the advanced users, you can use the file descriptors of the systems (note: emulated by pike on some systems - like NT). This is only useful for streaming purposes on unix systems. This is not recommended at all if you don't know what you're into. Default mode for this is "rw".
| 'r' | open file for reading |
| 'w' | open file for writing |
| 'a' | open file for append (use with 'w') |
| 't' | truncate file at open (use with 'w') |
| 'c' | create file if it doesn't exist (use with 'w') |
| 'x' | fail if file already exist (use with 'c') |
How should _always_ contain at least one of 'r' or 'w'.
The third argument is protection bits if the file is created. Default is 0666 (all read+write, in octal notation).
If a one is given as second argument to read(), read will not try its best to read as many bytes as you asked it to read, it will merely try to read as many bytes as the system read function will return. This mainly useful with stream devices which can return exactly one row or packet at a time.
If no arguments are given, read will read to the end of the file/stream.
If a one is given as a second argument to read_oob(), only as many bytes of out-of-band data as are currently available will be returned.
If no arguments are given, read_oob will read to the end of the stream.
It is not guaranteed that all out-of-band data sent from the other end will be received. Most streams only allow for a single byte of out-of-band data at a time.
It is not guaranteed that all out-of-band data will be received at the other end. Most streams only allow for a single byte of out-of-band data at a time. Some streams will send the rest of the data as ordinary data.
When out-of-band data arrives on the stream, read_oob_callback will be called with some or all of this data. When the stream allows out-of-band data to be sent, write_oob_callback is called so that you can write out-of-band data to it.
All callbacks will have the id of file as first argument when called.
If no arguments are given, the callbacks are not changed. The stream is just set to nonblocking mode.
/* Redirect stdin to come from the file 'foo' */
object o=Stdio.File();
o->open("foo","r");
o->dup2(Stdio.File("stdin"));
If you give a port number to this function, the socket will be bound to this port locally before connecting anywhere. This is only useful for some silly protocols like FTP. You may also specify an address to bind to if your machine has many IP numbers.
This function returns 1 for success, 0 otherwise. Note that if the socket is in nonblocking mode, you have to wait for a write or close callback before you know if the connection failed or not.
Here is an example of how to use the TCP functions in Stdio.File in blocking mode. This short program takes a URL as first argument, connects to the WWW server, sends a HEAD request and writes the reply to stdout. For clarity, all calls to Stdio.File use File:: even if that is not strictly necessary.
import Stdio;
inherit File;
int main(int argc, array(string) argv)
{
string host;
string path="";
int port=80;
sscanf(argv[1],"http://%s",argv[1]);
sscanf(argv[1],"%s/%s",host,path);
sscanf(host,"%s:%d",host,port);
if(!File::open_socket())
{
perror("Open socket failed");
exit(1);
}
if(!File::connect(host,port))
{
perror("Failed to connect to remote host");
exit(1);
}
File::write(sprintf("HEAD /%s HTTP/1.0\n",path));
stdout::write(File::read());
}
Example:
This example will read lines from standard input for as long as there are more lines to read. Each line will then be written to stdout together with the line number. We could use Stdio.stdout.write instead of just write because they are the same function.int main()
{
int line;
while(string s=Stdio.stdin.gets())
write(sprintf("%5d: %s\n",line++,s));
}
If the optional argument IP is given, bind will try to bind to this IP name (or number).
([ "data" : string recieved data "ip" : string recieved from this ip "port" : int ...and this port ])
([ "data" : string recieved data "ip" : string recieved from this ip "port" : int ...and this port ])
Lookup of terminal information will first be done in the systems terminfo database, and if that fails in the termcap database. If neither database exists, a hardcoded entry for "dumb" will be used.
infd defaults to Stdio.stdout.
interm defaults to Stdio.Terminfo.getTerm().
outfd defaults to infd, unless infd is 0, in which case outfd defaults to Stdio.stdout.
outterm defaults to interm.
Any of headers, from and trailers may be left out by setting them to 0.
Setting offset to -1 means send from the current position in from.
Setting len to -1 means send until from's end of file is reached.
For callback to be called, the backend must be active (ie main() must have returned -1).
In some cases, the backend must also be active for any sending to be performed at all.
This function filters the indata through the UNIX-command /bin/grep and return the result.string grep(string indata, string needle)
{
object out=Stdio.File(),in=Stdio.File();
object process=
Process.create_process(({"/bin/grep",needle}),
(["stdin":out->pipe(),
"stdout":in->pipe()]) );
out->write(indata);
out->close();
process->wait();
return in->read();
}
Usually WWW involves HTML. HTML (Hyper-Text Markup Language) is a way to write documents with embedded pictures and links to other pages. These links are normally displayed underlined and if you click them your WWW- browser will load whatever document that link leads to.
We inherit Stdio.Port into this program so we can bind a TCP socket to accept incoming connection. A socket is simply a number to separate communications to and from different programs on the same computer.#!/usr/local/bin/pike
/* A very small httpd capable of fetching files only. * Written by Fredrik Hübinette as a demonstration of Pike. */
inherit Stdio.Port;
Next are some constants that will affect how uHTTPD will operate. This uses the preprocessor directive #define. The preprocessor is the first stage in the compiling process and can make textual processing of the code before it is compiled. As an example, after the first define below, all occurrences of 'BLOCK' will be replaced with 16060.
A port is a destination for a TCP connection. It is simply a number on the local computer. 1905 is not the standard port for HTTP connections though, which means that if you want to access this WWW server from a browser you need to specify the port like this: http://my.host.my.domain:1905//* Amount of data moved in one operation */
#define BLOCK 16060
/* Where do we have the html files ? */
#define BASE "/usr/local/html/"
/* File to return when we can't find the file requested */
#define NOFILE "/user/local/html/nofile.html"
/* Port to open */
#define PORT 1905
Next we declare a class called output_class. Later we will clone one instance of this class for each incoming HTTP connection.
Our new class inherits Stdio.File twice. To be able to separate them they are then named 'socket' and 'file'.class output_class
{
inherit Stdio.File : socket;
inherit Stdio.File : file;
Then there is a global variable called offset which is initialized to zero. (Each instance of this class will have its own instance of this variable, so it is not truly global, but...) Note that the initialization is done when the class is cloned (or instantiated if you prefer C++ terminology).int offset=0;
Next we define the function write_callback(). Later the program will go into a 'waiting' state, until something is received to process, or until there is buffer space available to write output to. When that happens a callback will be called to do this. The write_callback() is called when there is buffer space available. In the following lines 'void' means that it does not return a value. Write callback will be used further down as a callback and will be called whenever there is room in the socket output buffer.
The following line means: call seek in the inherited program 'file'.void write_callback()
{
int written;
string data;
Move the file pointer to the where we want to the position we want to read from. The file pointer is simply a location in the file, usually it is where the last read() ended and the next will begin. seek() can move this pointer to where we want it though.file::seek(offset);
Read BLOCK (16060) bytes from the file. If there are less that that left to read only that many bytes will be returned.data=file::read(BLOCK);
If we managed to read something...if(strlen(data))
{
... we try to write it to the socket.written=socket::write(data);
Update offset if we managed to write to the socket without errors.if(written >= 0)
{
offset+=written;
return;
}
If something went wrong during writing, or there was nothing left to read we destruct this instance of this class.werror("Error: "+socket::errno()+".\n");
}
That was the end of write_callback()destruct(this_object());
}
Next we need a variable to buffer the input received in. We initialize it to an empty string.
And then we define the function that will be called when there is something in the socket input buffer. The first argument 'id' is declared as mixed, which means that it can contain any type of value. The second argument is the contents of the input buffer.string input="";
Append data to the string input. Then we check if we have received a a complete line yet. If so we parse this and start outputting the file.void read_callback(mixed id,string data)
{
string cmd;
input+=data;
This sscanf is pretty complicated, but in essence it means: put the first word in 'input' in 'cmd' and the second in 'input' and return 2 if successful, 0 otherwise.if(sscanf(input,"%s %s%*[\012\015 \t]",cmd,input)>2)
{
If the first word isn't GET print an error message and terminate this instance of the program. (and thus the connection)if(cmd!="GET")
{
werror("Only method GET is supported.\n");
destruct(this_object());
return;
}
Remove the leading slash.sscanf(input,"%*[/]%s",input);
Combine the requested file with the base of the HTML tree, this gives us a full filename beginning with a slash. The HTML tree is the directory on the server in which the HTML files are located. Normally all files in this directory can be accessed by anybody by using a WWW browser. So if a user requests 'index.html' then that file name is first added to BASE (/home/hubbe/www/html/ in this case) and if that file exists it will be returned to the browser.input=BASE+combine_path("/",input);
Try opening the file in read-only mode. If this fails, try opening NOFILE instead. Opening the file will enable us to read it later.if(!file::open(input,"r"))
{
If this fails too. Write an error message and destruct this object.if(!file::open(NOFILE,"r"))
{
Ok, now we set up the socket so we can write the data back.werror("Couldn't find default file.\n");
destruct(this_object());
return;
}
}
Set the buffer size to 64 kilobytes.socket::set_buffer(65536,"w");
Make it so that write_callback is called when it is time to write more data to the socket.socket::set_nonblocking(0,write_callback,0);
Jump-start the writing.write_callback();
That was the end of read_callback().}
}
This function is called if the connection is closed while we are reading from the socket.
This function is called when the program is instantiated. It is used to set up data the way we want it. Extra arguments to clone() will be sent to this function. In this case it is the object representing the new connection.void selfdestruct() { destruct(this_object()); }
We insert the data from the file f into 'socket'.void create(object f)
{
socket::assign(f);
Then we set up the callback functions and sets the file nonblocking. Nonblocking mode means that read() and write() will rather return that wait for I/O to finish. Then we sit back and wait for read_callback to be called.socket::set_nonblocking(read_callback,0,selfdestruct);
End of create()}
End of the new class.};
Next we define the function called when someone connects.
This creates a local variable of type 'object'. An object variable can contain a clone of any program. Pike does not consider clones of different programs different types. This also means that function calls to objects have to be resolved at run time.void accept_callback()
{
object tmp_output;
The function accept clones a Stdio.File and makes this equal to the newly connected socket.tmp_output=accept();
If it failed we just return.if(!tmp_output) return;
Otherwise we clone an instance of 'output_class' and let it take care of the connection. Each clone of output_class will have its own set of global variables, which will enable many connections to be active at the same time without data being mixed up. Note that the programs will not actually run simultaneously though.output_class(tmp_output);
Destruct the object returned by accept(), output_class has already copied the contents of this object.destruct(tmp_output);
Then there is main, the function that gets it all started.}
Write an encouraging message to stderr.int main(int argc, array(string) argv)
{
werror("Starting minimal httpd\n");
Bind PORT and set it up to call accept_callback as soon as someone connects to it. If the bind() fails we write an error message and return the 17 to indicate failure.if(!bind(PORT, accept_callback))
{
werror("Failed to open socket (already bound?)\n");
return 17;
}
If everything went ok, we return -17, any negative value returned by main() means that the program WON'T exit, it will hang around waiting for events instead. (like someone connecting)return - 17; /* Keep going */
That's it, this simple program can be used as the basis for a simple WWW-server. Note that today most WWW servers are very complicated programs, and the above program can never replace a modern WWW server. However, it is very fast if you only want a couple of web pages and have a slow machine available for the server.}
In POSIX threads, mutex locks can only be unlocked by the same thread
that locked them. In Pike any thread can unlock a locked mutex.
10.1 Starting a thread
Starting a thread is very easy. You simply call thread_create with a function
pointer and any arguments it needs and that function will be executed in a
separate thread. The function thread_create will return immediately and both
the calling function and the called function will execute at the same time. Example:
This may all seem very simple, but there are a few complications to
watch out for:
void foo(int x)
{
for(int e=0;e<5;e++)
{
sleep(1);
write("Hello from thread "+x+".\n");
}
}
int main()
{
thread_create(foo, 2);
thread_create(foo, 3);
foo(1);
}
This is quite harmless as long as it is only used from one thread at a time,
but if two threads call it it at the same time, there is a slight chance that
both threads will discover that map[i] is zero and both threads will
then do map[i]=({j}); and one value of j will be lost.
This type of bug can be extremely hard to debug.
The above problem can be solved with the help of Mutexes and Condition
variables. Mutexes are basically a way to keep other threads out while a task
is being performed. Conditions, or condition variables, are used to inform
other threads that they don't have to wait any longer. Pike also provides
two different kinds of pipelines to send data from one thread to another, which
makes it very simple to write threaded programs. Let's look at an example:
void mapadd(mapping m, int i, int j)
{
if(map[i])
map[i]+=({j});
else
map[i]=({j});
}
This is an example of a simple grep-like program. It looks for the string
given as first argument to the program in the files given as the rest
of the arguments. Don't worry if you do not understand it yet. Read the
descriptions of the functions and classes below and come back and read
this example again.
#!/usr/local/bin/pike
import Thread; // We need fifos
inherit Fifo; // Fifo used to supply workers
inherit Fifo : ended; // Fifo used to wait for workers
void worker(string lookfor)
{
while(string file=Fifo::read())
{
int linenum=1;
object o=Stdio.FILE(file,"r");
while(string line=o->gets())
{
if(search(line, lookfor) >=0)
write(sprintf("%s:%d: %s\n",file, linenum, line));
linenum++;
}
}
ended::write(0);
}
int main(int argc, array(string) argv)
{
for(int e=0;e<4;e++) // Start workers
thread_create(worker,argv[e]);
for(int e=2;e<argc;e++) // Feed workers
Fifo::write(argv[1]);
for(int e=0;e<4;e++) // Tell workers to die
Fifo::write(0);
for(int e=0;e<4;e++) // Wait for workers to die
ended::read();
exit(0);
}10.2 Threads reference section
This section describes all thread-related functions and classes.
/* This simple program can be used to exchange data between two
* programs. It is similar to Thread.Fifo, but can only hold one
* element of data.
*/
inherit Thread.Mutex : r_mutex;
inherit Thread.Mutex : w_mutex;
object r_lock=r_mutex::lock();
object w_lock;
mixed storage;
void write(mixed data)
{
w_lock=w_mutex::lock();
storage=data;
destruct(r_lock);
}
mixed read()
{
mixed tmp;
r_lock=r_mutex::lock();
tmp=storage;
storage=0;
destruct(w_lock);
return tmp;
}// This program implements a fifo that can be used to send
// data between two threads.
inherit Thread.Condition : r_cond;
inherit Thread.Condition: w_cond;
inherit Thread.Mutex: lock;
array buffer = allocate(128);
int r_ptr, w_ptr;
int query_messages() { return w_ptr - r_ptr; }
// This function reads one mixed value from the fifo.
// If no values are available it blocks until a write has been done.
mixed read()
{
mixed tmp;
// We use this mutex lock to make sure no write() is executed
// between the query_messages and the wait() call. If it did
// we would wind up in a deadlock.
object key=lock::lock();
while(!query_messages()) r_cond::wait(key);
tmp=buffer[r_ptr++ % sizeof(buffer)];
w_cond::signal();
return tmp;
}
// This function pushes one mixed value on the fifo.
// If the fifo is full it blocks until a value has been read.
void write(mixed v)
{
object key=lock::lock();
while(query_messages() == sizeof(buffer)) w_cond::wait(key);
buffer[w_ptr++ % sizeof(buffer)]=v;
r_cond::signal();
}
void wait(object mutex_key);
object(Thread.Fifo) Thread.Fifo();
object(Thread.Fifo) Thread.Fifo(int size);
#!/usr/local/bin/pike
/* A very small threaded httpd capable of fetching files only. * Written by Fredrik Hübinette as a demonstration of Pike */
import Thread;
inherit Stdio.Port;
/* number of bytes to read for each write */
#define BLOCK 16384
/* Where do we have the html files ? */
#define BASE "/home/hubbe/pike/src/"
/* File to return when we can't find the file requested */
#define NOFILE "/home/hubbe/www/html/nofile.html"
/* Port to open */
#define PORT 1905
/* Number of threads to start */
#define THREADS 5
// There will be one of these for each thread
class worker
{
inherit Stdio.FILE : socket; // For communication with the browser
inherit Stdio.File : file; // For reading the file from disc
void create(function accept)
{
string cmd, input, tmp;
while(1)
{
socket::close(); // Close previous connection
file::close();
object o=accept(); // Accept a connection
if(!o) continue;
socket::assign(o);
destruct(o);
// Read request
sscanf(socket::gets(),"%s %s%*[\012\015 \t]",cmd, input);
if(cmd!="GET")
{
werror("Only method GET is supported.\n");
continue;
}
// Open the requested file
sscanf(input,"%*[/]%s",input);
input=BASE+combine_path("/",input);
if(!file::open(input,"r"))
{
if(!file::open(NOFILE,"r"))
{
werror("Couldn't find default file.\n");
continue;
}
}
// Copy data to socket
while(socket::write(file::read(BLOCK))==BLOCK);
}
}
};
int main(int argc, array(string) argv)
{
werror("Starting minimal threaded httpd\n");
// Bind the port, don't set it nonblocking
if(!bind(PORT))
{
werror("Failed to open socket (already bound?)\n");
return 17;
}
// Start worker threads
for(int e=1;e<THREADS;e++) thread_create(worker,accept);
worker(accept);
}
As stated in the beginning of this chapter; Pike threads are only available on some UNIX systems. The above example does not work if your system does not have threads.
> Array.diff("Hello world!"/"","Help!"/"");
Result: ({ /* 2 elements */
({ /* 3 elements */
({ /* 3 elements */
"H",
"e",
"l"
}),
({ /* 8 elements */
"l",
"o",
" ",
"w",
"o",
"r",
"l",
"d"
}),
({ /* 1 elements */
"!"
})
}),
({ /* 3 elements */
({ /* 3 elements */
"H",
"e",
"l"
}),
({ /* 1 elements */
"p"
}),
({ /* 1 elements */
"!"
})
})
})
> Array.diff_compare_table("Hello world!"/"","Help!"/"");
Result: ({ /* 12 elements */
({ /* 1 elements */
0
}),
({ /* 1 elements */
1
}),
({ /* 1 elements */
2
}),
({ /* 1 elements */
2
}),
({ }),
({ }),
({ }),
({ }),
({ }),
({ /* 1 elements */
2
}),
({ }),
({ /* 1 elements */
4
})
})
> Array.diff_longest_sequence("Hello world!"/"","Help!"/"");
Result: ({ /* 4 elements */
0,
1,
2,
4
})
Result: ({ /* 3 elements */
"2",
"4",
"6"
})
Second syntax:
Filter array calls fun in all the objects in the array arr, and
return all objects that returned true.
Third syntax:
Filter array calls all function pointers in the array arr, and
return all that returned true.
> array a = ({ 1,2,3,4,2,3,5,6 });
Result: ({ /* 8 elements */
1,
2,
3,
4,
2,
3,
5,
6
})
> array seq = Array.longest_ordered_sequence(a);
Result: ({ /* 6 elements */
0,
1,
4,
5,
6,
7
})
> rows(a,seq);
Result: ({ /* 6 elements */
1,
2,
2,
3,
5,
6
})
Second syntax:
Map array calls function fun in all objects in the array arr.
i.e. arr[x]=arr[x]->fun(@ args);
Third syntax:
Map array calls the functions in the array arr:
arr[x]=arr[x]->fun(@ args);
Array.reduce(aggregate, indices(allocate(4))) ->
({ ({ ({ 0, 1 }), 2 }), 3 })
Array.reduce(`+, ({}), "FOO?") ->
"FOO?"
Array.reduce(lambda(int a, int b) {
while(b) { int t=b; b=a%b; a=t; }
return a;
}, ({7191,21573,64719,33694}))
-> 17
Array.rreduce(aggregate, indices(allocate(4))) ->
({ 0, ({ 1, ({ 2, 3 }) }) })
Result: ({ /* 9 elements */
1,
"1",
"a",
2,
"2",
"b",
3,
"3",
"c"
})
> Array.splice(({1,2,3}),({"1","2","3"}),({"a","b"}));
Result: ({ /* 9 elements */
1,
"1",
"a",
2,
"2",
"b",
})
array sum_arrays(function fun,array arr1,...)
{
int e;
array res=allocate(sizeof(arr1));
for(e=0;e<sizeof(arr1);e++)
{
res[e]=fun(arr1[e],arr2[e],...);
}
return res;
}
Simple ehh?
All images handled by this module are stored as 24-bit RGB images. This means that a 1024 pixel wide and 1024 pixel high image will use 1024*1024*3 bytes = 3 megabytes. It is quite easy to mess up and use up all the memory by giving the wrong argument to one of the scaling functions.
Most functions in this module work by creating a new Image and then returning that instead of changing the Image you are working with. This makes it possible to share the same image between many variables without having to worry that it will be changed by accident. This can reduce the amount of memory used.
Many functions in this module work with the 'current color', this can be thought of as the background color if you wish. To change the current color you use 'setcolor'.
Let's look at an example of how this can be used:
This very simple example can be used as a CGI script to produce a gif image which says what time it is in white text on a black background.#!/usr/local/bin/pike
int main()
{
write("Content-type: image/gif\n\n");
object font=Image.font();
font->load("testfont");
object image=font->write(ctime(time));
write(Image.GIF.encode(image));
}
| Image.Image | Basic image manipulation |
| Image.Font | Creating images from text |
| Image.Colortable | Color reduction, quantisation and dither |
| Image.Color | Color names, objects and conversion |
| encoding/decoding image files | |
| Image.GIF | GIF encoding/decoding capabilities |
| Image.JPEG | JPEG encoding/decoding capabilities (needs libjpeg) |
| Image.PNG | PNG encoding/decoding capabilities (needs libz) |
| Image.PNM | PNM (PBM/PGM/PPM) encoding/decoding capabilities |
| Image.XFace | XFace encoding/decoding capabilities (needs libgmp) |
| Image.XWD | XWD (X-windows dump) decoding capabilities |
| advanced | |
| Image.X | module for supporting X-windows low-level formats, keeping a lot of bit-mending stuff. |
Image module documentation is based on these file versions:$Id: blit.c,v 1.37 1999/06/18 19:19:14 mirar Exp $ $Id: blit_layer_include.h,v 1.6 1999/04/13 12:32:11 mirar Exp $ $Id: colors.c,v 1.30 2000/02/03 19:02:22 grubba Exp $ $Id: colortable.c,v 1.77 1999/10/30 11:51:41 mirar Exp $ $Id: colortable.h,v 1.17 1999/04/11 12:55:43 mirar Exp $ $Id: colortable_lookup.h,v 1.9 1999/04/10 02:02:07 mirar Exp $ $Id: dct.c,v 1.14 1999/06/18 19:19:20 mirar Exp $ $Id: any.c,v 1.16 2000/03/22 18:12:19 peter Exp $ $Id: bmp.c,v 1.20 2000/02/03 12:25:18 grubba Exp $ $Id: gif.c,v 1.50 1999/11/14 22:16:08 mast Exp $ $Id: gif_lzw.c,v 1.6 1999/05/30 20:11:14 mirar Exp $ $Id: gif_lzw.h,v 1.7 1999/05/30 20:11:15 mirar Exp $ $Id: ilbm.c,v 1.13 2000/02/03 19:01:29 grubba Exp $ $Id: pnm.c,v 1.20 1999/06/19 11:08:00 mirar Exp $ $Id: x.c,v 1.26 2000/03/27 07:42:35 hubbe Exp $ $Id: xwd.c,v 1.13 2000/01/11 01:42:36 mast Exp $ $Id: font.c,v 1.58 2000/03/25 23:34:32 hubbe Exp $ $Id: image.c,v 1.160 2000/04/09 06:15:17 per Exp $ $Id: image.h,v 1.35 1999/09/25 19:58:48 grubba Exp $ $Id: layers.c,v 1.43 2000/02/22 03:41:27 per Exp $ $Id: matrix.c,v 1.22 2000/04/09 06:15:17 per Exp $ $Id: operator.c,v 1.25 1999/09/14 23:17:15 marcus Exp $ $Id: orient.c,v 1.13 1999/06/19 20:24:48 hubbe Exp $ $Id: pattern.c,v 1.18 1999/07/16 11:44:20 mirar Exp $ $Id: poly.c,v 1.3 1999/07/28 09:26:20 mirar Exp $ $Id: polyfill.c,v 1.30 1999/06/19 20:24:49 hubbe Exp $ Experimental functions.
basic:
clear,
clone,
create,
xsize,
ysize
plain drawing:
box,
circle,
getpixel,
line,
setcolor,
setpixel,
threshold,
polyfill
operators:
`&,
`*,
`+,
`-,
`==,
`>,
`<,
`|
pasting images:
paste,
paste_alpha,
paste_alpha_color,
paste_mask
getting subimages, scaling, rotating:
autocrop,
clone,
copy,
dct,
mirrorx,
rotate,
rotate_ccw,
rotate_cw,
rotate_expand,
scale,
skewx,
skewx_expand,
skewy,
skewy_expand
calculation by pixels:
apply_matrix,
change_color,
color,
distancesq,
grey,
invert,
modify_by_intensity,
outline
select_from,
rgb_to_hsv,
hsv_to_rgb,
average, max, min, sum, sumf, find_min, find_max
special pattern drawing:
noise,
turbulence,
test,
tuned_box,
gradients,
random
2 2 pixel(x,y)= base+ k ( sum sum pixel(x+k-1,y+l-1)*matrix(k,l) ) k=0 l=0
1/k is sum of matrix, or sum of matrix multiplied with div. base is given by r,g,b and is normally black.
blur (ie a 2d gauss function):
({({1,2,1}),
({2,5,2}),
({1,2,1})})
|

|

|
| original | ||
sharpen (k>8, preferably 12 or 16):
({({-1,-1,-1}),
({-1, k,-1}),
({-1,-1,-1})})
|

| |
edge detect:
({({1, 1,1}),
({1,-8,1}),
({1, 1,1})})
|

| |
horisontal edge detect (get the idea):
({({0, 0,0}),
({1,-2,1}),
({0, 0,0})})
|

| |
emboss (might prefer to begin with a grey image):
({({2, 1, 0}),
({1, 0,-1}),
({0,-1,-2})}), 128,128,128, 3
|

|
|
| greyed |
This function is not very fast.
| argument(s) | description |
|
array(array(int|array(int))) | the matrix; innermost is a value or an array with red, green, blue values for red, green, blue separation. |
|
int r int g int b | base level of result, default is zero |
|
int|float div | division factor, default is 1.0. |
"Unneccesary" is all pixels that are equal -- ie if all the same pixels to the left are the same color, that column of pixels are removed.
The find_autocrop() function simply returns x1,y1,x2,y2 for the kept area. (This can be used with copy later.)
| argument(s) | description |
|
int border int left int right int top int bottom | which borders to scan and cut the image;
a typical example is removing the top and bottom unneccesary
pixels:
img=img->autocrop(0, 0,0,1,1); |
average() and sumf() may also wrap, but on a line basis. (Meaning, be careful with images that are wider than 8425104 pixels.) These functions may have a precision problem instead, during to limits in the 'double' C type and/or 'float' Pike type.
| argument(s) | description |
|
float factor | factor to use for both x and y |
|
float xfactor float yfactor | separate factors for x and y |
| argument(s) | description |
|
int newxsize int newysize | new image size in pixels |
|
 |
| original | ->box |
| argument(s) | description |
|
int x1 int y1 int x2 int y2 | box corners |
|
int r int g int b | color of the box |
|
int alpha | alpha value |
| argument(s) | description |
|
int tor int tog int tob | destination color and next current color |
|
int fromr int fromg int fromb | source color, default is current color |
|
 |
| original | ->circle |
| argument(s) | description |
|
int x int y | circle center |
|
int rx int ry | circle radius in pixels |
|
int r int g int b | color |
|
int alpha | alpha value |
|
 |
| original | ->clear |
| argument(s) | description |
|
int r int g int b | color of the new image |
|
int alpha | new default alpha channel value |
|
|
 |
| original | clone | clone(50,50) |
| argument(s) | description |
|
int xsize int ysize | size of (new) image in pixels, called image is cropped to that size |
|
int r int g int b | current color of the new image, default is black. Will also be the background color if the cloned image is empty (no drawing area made). |
|
int alpha | new default alpha channel value |
The red, green and blue values of the pixels are multiplied with the given value(s). This works best on a grey image...
The result is divided by 255, giving correct pixel values.
If no arguments are given, the current color is used as factors.
|
 |
| original | ->color(128,128,255); |
| argument(s) | description |
|
int r int g int b | red, green, blue factors |
|
int value | factor |
|
 |
 |
| original | ->copy |
->copy |
| argument(s) | description |
|
int x1 int y1 int x2 int y2 | The requested new area. Default is the old image size. |
|
int r int g int b | color of the new image |
|
int alpha | new default alpha channel value |
 |
 |
| Image.Image |
Image.Image |
The image can also be calculated from some special methods, for convinience:
channel modes; followed by a number of 1-char-per-pixel strings or image objects (where red channel will be used), or an integer value: "grey" : make a grey image (needs 1 source: grey) "rgb" : make an rgb image (needs 3 sources: red, green and blue) "cmyk" : make a rgb image from cmyk (cyan, magenta, yellow, black)generate modes; all extra arguments is given to the generation function. These has the same name as the method: "test," "gradients" "noise" "turbulence" "random" "randomgrey" specials cases: "tuned_box" (coordinates is automatic)
| argument(s) | description |
|
int xsize int ysize | size of (new) image in pixels |
|
Color color int r int g int b | background color (will also be current color), default color is black |
|
int alpha | default alpha channel value |
Method for scaling is rather complex; the image is transformed via a cosine transform, and then resampled back.
This gives a quality-conserving upscale, but the algorithm used is n*n+n*m, where n and m is pixels in the original and new image.
Recommended wrapping algorithm is to scale overlapping parts of the image-to-be-scaled.
This functionality is actually added as an true experiment, but works...
| argument(s) | description |
|
int newx int newy | new image size in pixels |
It write's dots on stderr, to indicate some sort of progress. It doesn't use any fct (compare: fft) algorithms.
The given value (or current color) are used for coordinates in the color cube. Each resulting pixel is the distance from this point to the source pixel color, in the color cube, squared, rightshifted 8 steps:
p = pixel color o = given color d = destination pixel d.red=d.blue=d.green= ((o.red-p.red)˛+(o.green-p.green)˛+(o.blue-p.blue)˛)>>8
|
 |
 |
 |
| original | distance˛ to cyan | ...to purple | ...to yellow |
| argument(s) | description |
|
int r int g int b | red, green, blue coordinates |
| argument(s) | description |
|
int r int g int b | weight of color, default is r=87,g=127,b=41, same as the grey() method. |
Intensity of new pixels are calculated by:
i' = i^g
For example, you are viewing your image on a screen with gamma 2.2. To correct your image to the correct gamma value, do something like:
my_display_image(my_image()->gamma(1/2.2);
| argument(s) | description |
|
int g int gred int ggreen int gblue | gamma value |
| argument(s) | description |
|
int x int y | position of the pixel |
|
 |
 |
 |
 |
 |
| original | 2 color gradient |
10 color gradient |
3 colors, grad=4.0 |
3 colors, grad=1.0 |
3 colors, grad=0.25 |
|
 |
 |
| original | ->grey(); | ->grey(0,0,255); |
| argument(s) | description |
|
int r int g int b | weight of color, default is r=87,g=127,b=41, which should be pretty accurate of what the eyes see... |
When converting to RGB, the input data is asumed to be placed in the pixels as above.
|
 |
 |
| original | ->hsv_to_rgb(); | ->rgb_to_hsv(); |
 |
 |
 |
| tuned box (below) | the rainbow (below) | same, but rgb_to_hsv() |
HSV to RGB calculation:
in = input pixel out = destination pixel h=-pos*c_angle*3.1415/(float)NUM_SQUARES; out.r=(in.b+in.g*cos(in.r)); out.g=(in.b+in.g*cos(in.r + pi*2/3)); out.b=(in.b+in.g*cos(in.r + pi*4/3));
RGB to HSV calculation: Hmm.
Example: Nice rainbow.
object i = Image.Image(200,200);
i = i->tuned_box(0,0, 200,200,
({ ({ 255,255,128 }), ({ 0,255,128 }),
({ 255,255,255 }), ({ 0,255,255 })}))
->hsv_to_rgb();
|
 |
 |
| original | ->invert(); | ->rgb_to_hsv()->invert()->hsv_to_rgb(); |
|
 |
| original | ->line |
| argument(s) | description |
|
int x1 int y1 int x2 int y2 | line endpoints |
|
int r int g int b | color |
|
int alpha | alpha value |
//Stina is an image with a cat. array(object) Stina4=Stina->orient4(); Stina4[1]*=215; Stina4[3]*=215; string foo=Stina->make_ascii(@Stina4,40,4,8);
| / - \ hue= 0 64 128 192 (=red in an hsv image)
Replacement examples:
Old code:
img=map_fs(img->select_colors(200));New code:
img=Image.Colortable(img,200)->floyd_steinberg()->map(img);
Old code:
img=map_closest(img->select_colors(17)+({({255,255,255}),({0,0,0})}));
New code:
img=Image.Colortable(img,19,({({255,255,255}),({0,0,0})}))->map(img);
new pixel value = sum( my_abs(needle_pixel-haystack_pixel))
The new image only have the red rgb-part set.
| argument(s) | description |
|
int|float scale | Every pixel is divided with this value. Note that a proper value here depends on the size of the neadle. |
|
object needle | The image to use for the matching. |
|
object haystack_cert | This image should be the same size as the image itselves. A non-white-part of the haystack_cert-image modifies the output by lowering it. |
|
object needle_cert | The same, but for the needle-image. |
|
int foo object haystack_avoid | This image should be the same size as the image itselves. If foo is less than the red value in haystack_avoid the corresponding matching-calculating is not calculated. The avoided parts are drawn in the color 0,100,0. |
|
 |
| original | ->mirrorx(); |
|
 |
| original | ->mirrory(); |
For each color an intensity is calculated, from r, g and b factors (see grey), this gives a value between 0 and max.
The color is then calculated from the values given, v1 representing the intensity value of 0, vn representing max, and colors between representing intensity values between, linear.
|
 |
| original | ->grey()->modify_by_intensity(1,0,0, 0,({255,0,0}),({0,255,0})); |
| argument(s) | description |
|
int r int g int b | red, green, blue intensity factors |
|
int|array(int) v1 int|array(int) vn | destination color |
The random seed may be different with each instance of pike.
Example:
->noise( ({0,({255,0,0}), 0.3,({0,255,0}), 0.6,({0,0,255}), 0.8,({255,255,0})}), 0.2,0.0,0.0,1.0 );

| argument(s) | description |
|
array(float|int|array(int)) colorrange | colorrange table |
|
float scale | default value is 0.1 |
|
float xdiff float ydiff | default value is 0,0 |
|
float cscale | default value is 1 |
orient gives an HSV image (run a hsv_to_rgb pass on it to get a viewable image). corresponding to the angle of the orientation:
| / - \ hue= 0 64 128 192 (=red in an hsv image) purple cyan green redRed, green and blue channels are added and not compared separately.
If you first use orient4 you can give its output as input to this function.
The orient4 function gives back 4 image objects, corresponding to the amount of different directions, see above.
Default is to paint above, below, to the left and the right of these pixels.
You can also run your own outline mask.
The outline_mask function gives the calculated outline as an alpha channel image of white and black instead.
|
 |
 |
| original | masked through threshold |
...and outlined with red |
| argument(s) | description |
|
array(array(int)) mask | mask matrix. Default is ({({0,1,0}),({1,1,1}),({0,1,0})}). |
|
int olr int olg int olb | outline color. Default is current. |
|
int bkgr int bkgg int bkgb | background color (what color to outline to); default is color of pixel 0,0. |
|
int|float div | division factor, default is 1.0. |
| argument(s) | description |
|
object image | image to paste (may be empty, needs to be an image object) |
|
int x int y | where to paste the image; default is 0,0 |
An alpha channel value of 0 leaves nothing of the original image in the paste area, 255 is meaningless and makes the given image invisible.
| argument(s) | description |
|
object image | image to paste |
|
int alpha | alpha channel value |
|
int x int y | where to paste the image; default is 0,0 |
A pixel value of 255 makes the result become the color given, 0 doesn't change anything.
The masks red, green and blue values are used separately. If no color are given, the current is used.
| argument(s) | description |
|
object mask | mask image |
|
int r int g int b | what color to paint with; default is current |
|
int x int y | where to paste the image; default is 0,0 |
A pixel value of 255 makes the result become a pixel from the given image, 0 doesn't change anything.
The masks red, green and blue values are used separately.
| argument(s) | description |
|
object image | image to paste |
|
object mask | mask image |
|
int x int y | where to paste the image; default is 0,0 |
phaseh gives an image where
max falling min rising value= 0 64 128 192
0 is set if there is no way to determine if it is rising or falling. This is done for the every red, green and blue part of the image.
Phase images can be used to create ugly effects or to find meta-information in the orginal image.
|
 |
 |
 |
 |
| original | phaseh() | phasev() | phasevh() | phasehv() |
| argument(s) | description |
|
array(int|float) curve | curve(s), ({x1,y1,x2,y2,...,xn,yn}),
automatically closed.
If any given curve is inside another, it will make a hole. |
|
 |
 |
 |
 |
 |
| original | ->random() | ->random(17) | greyed (same again) |
color(red) (same again) |
...red channel |
Use with ->grey() or ->color() for one-color-results.
The string is nullpadded or cut to fit.
| argument(s) | description |
|
string what | the hidden message |
|
 |
 |
| original | ->rotate(15,255,0,0); | ->rotate_expand(15); |
The "expand" variant of functions stretches the image border pixels rather then filling with the given or current color.
This rotate uses the skewx() and skewy() functions.
| argument(s) | description |
|
int|float angle | the number of degrees to rotate |
|
int r int g int b | color to fill with; default is current |
|
 |
| original | ->rotate_ccw(); |
|
 |
| original | ->rotate_cw(); |
| argument(s) | description |
|
float factor | factor to use for both x and y |
|
float xfactor float yfactor | separate factors for x and y |
| argument(s) | description |
|
int newxsize int newysize | new image size in pixels |
This is very close to a floodfill.
The image is scanned from the given pixel, filled with 255 if the color is the same, or 255 minus distance in the colorcube, squared, rightshifted 8 steps (see distancesq).
When the edge distance is reached, the scan is stopped. Default edge value is 30. This value is squared and compared with the square of the distance above.
| argument(s) | description |
|
int x int y | originating pixel in the image |
| argument(s) | description |
|
int r int g int b | new color |
|
int alpha | new alpha value |
|
 |
| original | ->setpixel |
| argument(s) | description |
|
int x int y | position of the pixel |
|
int r int g int b | color |
|
int alpha | alpha value |
|
 |
 |
| original | ->skewx(15,255,0,0); | ->skewx_expand(15); |
| argument(s) | description |
|
int x | the number of pixels The "expand" variant of functions stretches the image border pixels rather then filling with the given or current color. |
|
float yfactor | best described as: x=yfactor*this->ysize() |
|
int r int g int b | color to fill with; default is current |
|
 |
 |
| original | ->skewy(15,255,0,0); | ->skewy_expand(15); |
The "expand" variant of functions stretches the image border pixels rather then filling with the given or current color.
| argument(s) | description |
|
int y | the number of pixels |
|
float xfactor | best described as: t=xfactor*this->xsize() |
|
int r int g int b | color to fill with; default is current |
|
 |
|
| original | ->test() | ...and again |
If any of red, green, blue parts of a pixel is larger then the given value, the pixel will become white, else black.
This method works fine with the grey method.
If no arguments are given, it will paint all non-black pixels white. (Ie, default is 0,0,0.)
|
 |
 |
| original | ->threshold(100); | ->threshold(0,100,0); |
Tuning function is (1.0-x/xw)*(1.0-y/yw) where x and y is the distance to the corner and xw and yw are the sides of the rectangle.
|
 |
 |
 |
| original | tuned box | solid tuning (blue,red,green,yellow) |
tuning transparency (as left + 255,128,128,0) |
| argument(s) | description |
|
int x1 int y1 int x2 int y2 | rectangle corners |
|
array(array(int)) corner_color | colors of the corners:
({x1y1,x2y1,x1y2,x2y2})
each of these is an array of integeres:
({r,g,b}) or ({r,g,b,alpha})
Default alpha channel value is 0 (opaque). |
The random seed may be different with each instance of pike.
Example:
->turbulence( ({0,({229,204,204}), 0.9,({229,20,20}), 0.9,Color.black}) );

| argument(s) | description |
|
array(float|int|array(int)) colorrange | colorrange table |
|
int octaves | default value is 3 |
|
float scale | default value is 0.1 |
|
float xdiff float ydiff | default value is 0,0 |
|
float cscale | default value is 1 |
| argument(s) | description |
|
object operand | the other image to divide with; the images must have the same size. |
|
Color color int value | if specified as color or value, it will act as a whole image of that color (or value). |
| argument(s) | description |
|
object operand | the other image to compare with; the images must have the same size. |
|
array(int) color | an array in format ({r,g,b}), this is equal to using an uniform-colored image. |
|
int value | equal to ({value,value,value}). |
Comparision is strict and on pixel-by-pixel basis. (Means if not all pixel r,g,b values are correct compared with the corresponding pixel values, 0 is returned.)
| argument(s) | description |
|
object operand | the other image to compare with; the images must have the same size. |
|
array(int) color | an array in format ({r,g,b}), this is equal to using an uniform-colored image. |
|
int value | equal to ({value,value,value}). |
a>=b and a<=b between objects is equal to !(a<b) and !(a>b), which may not be what you want (since both < and > can return false, comparing the same images).
This can be useful to lower the values of an image, making it greyer, for instance:
image=image*128+64;
| argument(s) | description |
|
object operand | the other image to multiply with; the images must have the same size. |
|
array(int) color | an array in format ({r,g,b}), this is equal to using an uniform-colored image. |
|
int value | equal to ({value,value,value}). |
| argument(s) | description |
|
object operand | the image which to add. |
|
array(int) color | an array in format ({r,g,b}), this is equal to using an uniform-colored image. |
|
int value | equal to ({value,value,value}). |
| argument(s) | description |
|
object operand | the other image to compare with; the images must have the same size. |
|
array(int) color | an array in format ({r,g,b}), this is equal to using an uniform-colored image. |
|
int value | equal to ({value,value,value}). |
| argument(s) | description |
|
object operand | the other image to compare with; the images must have the same size. |
|
array(int) color | an array in format ({r,g,b}), this is equal to using an uniform-colored image. |
|
int value | equal to ({value,value,value}). |
The object has color reduction, quantisation, mapping and dithering capabilities.
add takes the same argument(s) as create, thus adding colors to the colortable.
The colortable is mostly a list of colors, or more advanced, colors and weight.
The colortable could also be a colorcube, with or without additional scales. A colorcube is the by-far fastest way to find colors.
Example:
ct=colortable(my_image,256); // the best 256 colors
ct=colortable(my_image,256,({0,0,0})); // black and the best other 255
ct=colortable(({({0,0,0}),({255,255,255})})); // black and white
ct=colortable(6,7,6); // a colortable of 252 colors
ct=colortable(7,7,5, ({0,0,0}),({255,255,255}),11);
// a colorcube of 245 colors, and a greyscale of the rest -> 256
| argument(s) | description |
|
array(array(int)) colors | list of colors |
|
object(Image.Image) image | source image |
|
int number | number of colors to get from the image
0 (zero) gives all colors in the image. Default value is 256. |
|
array(array(int)) needed | needed colors (to optimize selection of others to these given)
this will add to the total number of colors (see argument 'number') |
|
int r int g int b | size of sides in the colorcube, must (of course) be equal or larger than 2 - if smaller, the cube is ignored (no colors). This could be used to have only scales (like a greyscale) in the output. |
|
array(int) fromi array(int) toi int stepi | This is to add the possibility of adding a scale
of colors to the colorcube; for instance a grayscale
using the arguments ({0,0,0}),({255,255,255}),17,
adding a scale from black to white in 17 or more steps.
Colors already in the cube is used again to add the number of steps, if possible. The total number of colors in the table is therefore r*b*g+step1+...+stepn. |
example: (mapping)Image.Colortable(img)
| argument(s) | description |
|
string to | must be "string", "array" or "mapping". |
The colorspace is divided in small cubes, each cube containing the colors in that cube. Each cube then gets a list of the colors in the cube, and the closest from the corners and midpoints between corners.
When a color is needed, the algorithm first finds the correct cube and then compares with all the colors in the list for that cube.
example: colors=Image.Colortable(img)->cubicles();
algorithm time: between O[m] and O[m * n], where n is numbers of colors and m is number of pixels
The arguments can be heavy trimmed for the usage of your colortable; a large number (10×10×10 or bigger) of cubicles is recommended when you use the colortable repeatedly, since the calculation takes much more time than usage.
recommended values:
image size setup 100×100 cubicles(4,5,4) (default) 1000×1000 cubicles(12,12,12) (factor 2 faster than default)
In some cases, the full method is faster.
|
 |
 |
| original | default cubicles, 16 colors |
accuracy=200 |
| argument(s) | description |
|
int r int g int b | Size, ie how much the colorspace is divided. Note that the size of each cubicle is at least about 8b, and that it takes time to calculate them. The number of cubicles are r*g*b, and default is 4,5,4, ie 80 cubicles. This works good for 200±100 colors. |
|
int accuracy | Accuracy when checking sides of cubicles. Default is 16. A value of 1 gives complete accuracy, ie cubicle() method gives exactly the same result as full(), but takes (in worst case) 16× the time to calculate. |
Not applicable to colorcube types of colortable.
The arguments to this method is for fine-tuning of the algorithm (for computer graphics wizards).
|
 |
 |
| original | floyd_steinberg to a 4×4×4 colorcube | floyd_steinberg to 16 chosen colors |
| argument(s) | description |
|
int bidir | Set algorithm direction of forward. -1 is backward, 1 is forward, 0 for toggle of direction each line (default). |
|
int|float forward int|float downforward int|float down int|float downback | Set error correction directions. Default is forward=7, downforward=1, down=5, downback=3. |
|
int|float factor | Error keeping factor. Error will increase if more than 1.0 and decrease if less than 1.0. A value of 0.0 will cancel any dither effects. Default is 0.95. |
example: colors=Image.Colortable(img)->full();
algorithm time: O[n*m], where n is numbers of colors and m is number of pixels
each pixel in the image object is an entry in the colortable
 |
 |
 |
|
 |
no dither | |
 |
 |
 |
|
 |
floyd_steinberg dither | |
 |
 |
 |
 |
 |
ordered dither | |
|
 |
 |
 |
 |
 |
randomcube dither |
| original | 2 | 4 | 8 | 16 | 32 colors |
|
 |
 |
 |
| original | mapped to Image.Colortable(6,6,6)-> |
||
| ordered (42,42,42,2,2) |
ordered() | ordered (42,42,42, 8,8, 0,0, 0,1, 1,0) |
|
 |
 |
 |
 |
| argument(s) | description |
|
int r int g int b | The maximum error. Default is 32, or colorcube steps (256/size). |
|
int xsize int ysize | Size of error matrix. Default is 8×8. Only values which factors to multiples of 2 and 3 are possible to choose (2,3,4,6,8,12,...). |
|
int x int y int rx int ry int gx int gy int bx int by | Offset for the error matrix. x and y is for both red, green and blue values, the other is individual. |
The randomgrey method uses the same random error on red, green and blue and the randomcube method has three random errors.
|
 |
 |
| original | mapped to Image.Colortable(4,4,4)-> |
|
| randomcube() | randomgrey() | |
|
 |
 |
| argument(s) | description |
|
int r int g int b int err | The maximum error. Default is 32, or colorcube step. |
All needed (see create) colors are kept.
reduce_fs creates and keeps the outmost corners of the color space, to improve floyd-steinberg dithering result. (It doesn't work very well, though.)
| argument(s) | description |
|
int colors | target number of colors |
reduce_fs keeps the "corners" as "needed colors".
This is a very simple way of finding the correct color. The algorithm initializes a cube with r x g x b colors, where every color is chosen by closest match to the corresponding coordinate.
This format is not recommended for exact match, but may be usable when it comes to quickly view pictures on-screen.
It has a high init-cost and low use-cost. The structure is initiated at first usage.
Default factors are 3, 4 and 1; blue is much darker than green. Compare with Image.Image->grey().
| argument(s) | description |
|
object(Colortable) with | Colortable object with colors to add |
| argument(s) | description |
|
object(Colortable) with | Colortable object with colors to subtract |
(What really happens is that the image and alpha channel is checked, and edges equal the fill setup is cropped away.)
find_autocrop() returns an array of xoff,yoff,xsize,ysize, which can be fed to crop().
left...bottom arguments can be used to tell what sides cropping are ok on.
"normal", "add", "subtract", "multiply", "divide", "modulo", "invsubtract", "invdivide", "invmodulo", "difference", "max", "min", "bitwise_and", "bitwise_or", "bitwise_xor",
"replace", "red", "green", "blue",
"replace_hsv", "hue", "saturation", "value", "color",
"darken", "lighten",
"dissolve", "behind", "erase",
available_modes() simply gives an array containing the names of these modes.
"image":image, // default: blackThe layer can also be created "empty", either giving a size and color - this will give a filled opaque square, or a color, which will set the "fill" values and fill the whole layer with an opaque color."alpha":alpha, // alpha channel object // default: full opaque
"mode":string mode, // layer mode, see mode. // default: "normal"
"alpha_value":float(0.0-1.0), // layer general alpha value // default is 1.0; this is multiplied // with the alpha channel.
"xoffset":int, "yoffset":int, // offset of this layer
"fill":Color, "fill_alpha":Color, // fill color, ie what color is used // "outside" the image. default: black // and black (full transparency).
"tiled":int(0|1), // select tiling; if 1, the image // will be tiled. deafult: 0, off
All values can be modified after object creation.
The fill values are used if the layer is enlarged.
As an example, the XCF and PSD image decoders set the 'name' attribute to the name the layer had in the source file.
For simple usage, see write and load.
other methods: baseline, height, set_xspacing_scale, set_yspacing_scale, text_extents
struct file_head
{
unsigned INT32 cookie; - 0x464f4e54
unsigned INT32 version; - 1
unsigned INT32 chars; - number of chars
unsigned INT32 height; - height of font
unsigned INT32 baseline; - font baseline
unsigned INT32 o[1]; - position of char_head's
} *fh;
struct char_head
{
unsigned INT32 width; - width of this character
unsigned INT32 spacing; - spacing to next character
unsigned char data[1]; - pixmap data (1byte/pixel)
} *ch;
version 2:
On-disk syntax (everything in N.B.O), int is 4 bytes, a byte is 8 bits:
pos
0 int cookie = 'FONT'; or 0x464f4e54
4 int version = 2; 1 was the old version without the last four chars
8 int numchars; Always 256 in this version of the dump program
12 int height; in (whole) pixels
16 int baseline; in (whole) pixels
20 char direction; 1==right to left, 0 is left to right
21 char format; Font format
22 char colortablep; Colortable format
23 char kerningtablep; Kerning table format
24 int offsets[numchars]; pointers into the data, realative to &cookie.
[colortable]
[kerningtable]
At each offset:
0 int width; in pixels
4 int spacing; in 1/1000:th of a pixels
8 char data[]; Enough data to plot width * font->height pixels
Please note that if width is 0, there is no data.
Font formats:
id type
0 Raw 8bit data
1 RLE encoded data, char length, char data, 70% more compact than raw data
2 ZLib compressed data 60% more compact than RLE
Colortable types:
0 No colortable (the data is an alpha channel)
1 24bit RGB with alpha (index->color, 256*4 bytes, rgba)
2 8bit Greyscale with alpha (index->color, 256*2 bytes)
Kerningtable types:
0 No kerning table
1 numchars*numchars entries, each a signed char with the kerning value
2 numchar entries, each with a list of kerning pairs, like this:
int len
len * (short char, short value)
**!
| argument(s) | description |
|
string text, ... | One or more lines of text. |
| argument(s) | description |
|
string filename | Font file |
| argument(s) | description |
|
float scale | what scale to use |
| argument(s) | description |
|
string text, ... | One or more lines of text. |
A color is here an object, containing color information and methods for conversion, see below.
Image.Color can be called to make a color object. Image.Color() takes the following arguments:
Image.Color(string name) // "red" Image.Color(string prefix_string) // "lightblue" Image.Color(string hex_name) // "#ff00ff" Image.Color(string cmyk_string) // "%17,42,0,19.4" Image.Color(string hsv_string) // "%@327,90,32" Image.Color(int red, int green, int blue)
The color names available can be listed by using indices on Image.Color. The colors are available by name directly as Image.Color.name, too:
...Image.Color.red... ...Image.Color.green... or, maybe import Image.Color; ...red... ...green... ...lightgreen...
Giving red, green and blue values is equal to calling Image.Color.rgb().
The prefix_string method is a form for getting modified colors, it understands all modifiers (light, dark, bright, dull and neon). Simply use "method"+"color"; (as in lightgreen, dullmagenta, lightdullorange).
The hex_name form is a simple #rrggbb form, as in HTML or X-program argument. A shorter form (#rgb) is also accepted. This is the inverse to the Image.Color.Color->hex() method.
The cmyk_string is a string form of giving cmyk (cyan, magenta, yellow, black) color. These values are floats representing percent.
The hsv_string is another hue, saturation, value representation, but in floats; hue is in degree range (0..360), and saturation and value is given in percent. This is not the same as returned or given to the hsv() methods!
If you are using colors from for instance a webpage, you might want to create the color from Image.Color.guess(), since that method is more tolerant for mistakes and errors.
Image.Color() is case- and space-sensitive. Use Image.Color.guess() to catch all variants.
and subtract with a space (lower_case(x)-" ") to make sure you get all variants.
The html() method only understands the HTML color names, or the #rrggbb form. It is case insensitive.
| method | effect | h | s | v | as |
|---|---|---|---|---|---|
| light | raise light level | ±0 | ±0 | +50 | |
| dark | lower light level | ±0 | ±0 | -50 | |
| bright | brighter color | ±0 | +50 | +50 | |
| dull | greyer color | ±0 | -50 | -50 | |
| neon | set to extreme | ±0 | max | max |
light and dark lower/highers saturation when value is min-/maximised respective.
They give an array of
red, green and blue (rgb) values (color value),
hue, saturation and value (hsv) values (range as color value),
cyan, magenta, yellow, black (cmyk) values (in percent)
or the greylevel value (range as color value).
The greylevel is calculated by weighting red, green and blue. Default weights are 87, 127 and 41, respective, and could be given by argument.
hex() simply gives a string on the #rrggbb format. If n is given, the number of significant digits is set to this number. (Ie, n=3 gives #rrrgggbbb.)
name() is a simplified method; if the color exists in the database, the name is returned, per default is the hex() method use.
html() gives the HTML name of the color, or the hex(2) if it isn't one of the 16 HTML colors.
object red=Image.Color.red; object other=Image.Color. ...; object black=Image.Color.black;if (red==other) ... if (red==({255,0,0})) ... if (black==0) ... if (red=="red") ...
| argument(s) | description |
|
object image | the image object to encode |
|
int bpp | bits per pixel, how many bits each pixel should take |
|
int vbpp | value bits per pixel; how many bits per pixel that really contains information |
|
int alignbits | the number of even bits each line should be padded to |
|
object colortable | colortable to get indices for pseudocolor |
|
string translate | translate table for colors. Length of this string should be 1<<vbpp (or 2<<vbpp if vbpp are greater than 8). |
encode_truecolor(img, 12,32, 0, 3,5, 4,0, 3,8)
will give (aligned to even 32 bits for each row):
0bbbrrr0 gggg0bbb rrr0gggg 0bbb...
<--pixel 1--><--pixel 2--> <--3-->
10987654 32101098 76543210 1098... <- bit position
<-><-> <-->
| | +--- 4,0: 4 bits green shifted 0 bits
| +-------- 3,5: 3 bits red shifted 5 bits
+----------- 3,8: 3 bits blue shifted 8 bits
The above call is equal to
encode_truecolor_masks(img, 12,32, 0, 224, 15, 768)
and
encode_truecolor(img, 12,32, 0, 3,5,4,0,3,8, colortable(1<<3,1<<4,1<<3)).
The latter gives possibility to use dither algorithms,
but is slightly slower.
| argument(s) | description |
|
object image | the image object to encode |
|
int bpp | bits per pixel, how many bits each pixel should take |
|
int alignbits | the number of even bits each line should be padded to |
|
int rbits int gbits int bbits | bits for each basecolor |
|
int rshift int gshift int bshift | leftshifts for each basecolor |
|
int rmask int gmask int bmask | masks for each basecolor (xbits and gbits are calculated from this), needs to be massive (no zeroes among the ones in the mask). |
|
object ct | colortable object (for dithering, or whatever) |
|
int swapbytes | swap bytes for bpp==16,24,32, swaps bits in the bytes if bpp==1, for change of byte/bitorder between client and server. |
Methods: decode, decode_alpha, _decode
The result of _decode() is a mapping that contains
"type":image data type (ie, "image/jpeg" or similar) "image":the image object, "alpha":the alpha channel or 0 if N/A
An AVS file is a raw (uncompressed) 24 bit image file with alpha. The alpha channel is 8 bit, and there is no separate alpha for r, g and b.
BMP is common in the Windows environment.
Simple encoding:
encode
decode gives an image object, _decode gives a mapping in the format
"type":"image/bmp", "image":image object, "colortable":colortable object (if applicable)"xsize":int, "ysize":int, "compression":int, "bpp":int, "windows":int,
option is a mapping that may contain:
"colortable": Image.Colortable - palette "bpp": 1|4|8|24 - force this many bits per pixel "rle": 0|1 - run-length encode (default is 0)
| argument(s) | description |
|
object image | Source image. |
|
object colortable | Colortable object, shortcut for "colortable" in options. |
GD is the internal format of libgd by Thomas Boutell, http://www.boutell.com/gd/ It is a rather simple, uncompressed, palette format.
The decode_header and _decode has these elements:
"image":object - image object \ "alpha":object - decoded alpha |- not decode_header "colortable":object - decoded palette /"type":"image/x-gd" - image type "xsize":int - horisontal size in pixels "ysize":int - vertical size in pixels "alpha_index":int - index to transparancy in palette -1 means no transparency "colors":int - numbers of colors
options is a mapping with optional values:
"colortable":object - palette to use (max 256 colors) "alpha":object - alpha channel (truncated to 1 bit) "alpha_index":int - index to transparancy in palette
GIF is a common image storage format, usable for a limited color palette - a GIF image can only contain as most 256 colors - and animations.
Simple encoding: encode, encode_trans
Advanced stuff: render_block, header_block, end_block, netscape_loop_block
Very advanced stuff: _render_block, _gce_block
"image":the image "alpha":the alpha channel"xsize":int "ysize":int size of image "type":"image/gif" file type information as MIME type
The latter (encode_trans) functions add transparency capabilities.
Example:
img=Image.Image([...]); [...] // make your very-nice image write(Image.GIF.encode(img)); // write it as GIF on stdout
| argument(s) | description |
|
object img | The image which to encode. |
|
int colors object colortable | These arguments decides what colors the image should be encoded with. If a number is given, a colortable with be created with (at most) that amount of colors. Default is '256' (GIF maximum amount of colors). |
|
object alpha | Alpha channel image (defining what is transparent); black
color indicates transparency. GIF has only transparent
or nontransparent (no real alpha channel).
You can always dither a transparency channel:
Image.Colortable(my_alpha, ({({0,0,0}),({255,255,255})})) |
|
int tr_r int tr_g int tr_b | Use this (or the color closest to this) color as transparent pixels. |
|
int a_r int a_g int a_b | Encode transparent pixels (given by alpha channel image) to have this color. This option is for making GIFs for the decoders that doesn't support transparency. |
|
int transp_index | Use this color no in the colortable as transparent color. |
Image.GIF.encode_trans(img,colortable,alpha);is equivalent of using
Image.GIF.header_block(img->xsize(),img->ysize(),colortable)+ Image.GIF.render_block(img,colortable,0,0,0,alpha)+ Image.GIF.end_block();and is actually implemented that way.
The result of this function is always ";" or "\x3b", but I recommend using this function anyway for code clearity.
Giving a colortable to this function includes a global palette in the header block.
| argument(s) | description |
|
int xsize int ysize | Size of drawing area. Usually same size as in the first (or only) render block(s). |
|
int background_color_index | This color in the palette is the background color. Background is visible if the following render block(s) doesn't fill the drawing area or are transparent. Most decoders doesn't use this value, though. |
|
int gif87a | If set, write 'GIF87a' instead of 'GIF89a' (default 0 == 89a). |
|
int aspectx int aspecty | Aspect ratio of pixels, ranging from 4:1 to 1:4 in increments of 1/16th. Ignored by most decoders. If any of aspectx or aspecty is zero, aspectratio information is skipped. |
|
int r int g int b | Add this color as the transparent color. This is the color used as transparency color in case of alpha-channel given as image object. This increases (!) the number of colors by one. |
This GIF encoder doesn't support different size of colors in global palette and color resolution.
| argument(s) | description |
|
int number_of_loops | Number of loops. Max and default is 65535. |
Example:
img1=Image.Image([...]); img2=Image.Image([...]); [...] // make your very-nice images nct=Image.Colortable([...]); // make a nice colortable write(Image.GIF.header_block(xsize,ysize,nct)); // write a GIF header write(Image.GIF.render_block(img1,nct,0,0,0,10)); // write a render block write(Image.GIF.render_block(img2,nct,0,0,0,10)); // write a render block [...] write(Image.GIF.end_block()); // write end block // voila! A GIF animation on stdout.
 The above animation is thus created:
object nct=colortable(lena,32,({({0,0,0})}));
string s=GIF.header_block(lena->xsize(),lena->ysize(),nct);
foreach ( ({lena->xsize(),
(int)(lena->xsize()*0.75),
(int)(lena->xsize()*0.5),
(int)(lena->xsize()*0.25),
(int)(1),
(int)(lena->xsize()*0.25),
(int)(lena->xsize()*0.5),
(int)(lena->xsize()*0.75)}),int xsize)
{
object o=lena->scale(xsize,lena->ysize());
object p=lena->clear(0,0,0);
p->paste(o,(lena->xsize()-o->xsize())/2,0);
s+=GIF.render_block(p,nct,0,0,0,25);
}
s+=GIF.netscape_loop_block(200);
s+=GIF.end_block();
write(s);
| argument(s) | description |
|
object img | The image. |
|
object colortable | Colortable with colors to use and to write as palette. |
|
int x int y | Position of this image. |
|
int localpalette | If set, writes a local palette. |
|
object alpha | Alpha channel image; black is transparent. |
|
int r int g int b | Color of transparent pixels. Not all decoders understands transparency. This is ignored if localpalette isn't set. |
|
int delay | View this image for this many centiseconds. Default is zero. |
|
int transp_index | Index of the transparent color in the colortable. -1 indicates no transparency. |
|
int user_input | If set: wait the delay or until user input. If delay is zero, wait indefinitely for user input. May sound the bell upon decoding. Default is non-set. |
|
int disposal | Disposal method number;
|
The user_input and disposal method are unsupported in most decoders.
({int xsize,int ysize, // 0: size of image drawing area
void|object colortable, // 2: opt. global colortable
({ int aspx, int aspy, // 3 0: aspect ratio or 0, 0 if not set
int background }), // 2: index of background color
followed by any number these blocks in any order (gce chunks
are decoded and incorporated in the render chunks):
({ GIF.RENDER, // 0: block identifier
int x, int y, // 1: position of render
object image, // 3: render image
void|object alpha, // 4: 0 or render alpha channel
object colortable, // 5: colortable (may be same as global)
int interlace, // 6: interlace flag
int trans_index, // 7: 0 or transparent color index
int delay, // 8: 0 or delay in centiseconds
int user_input, // 9: user input flag
int disposal}) // 10: disposal method number (0..7)
({ GIF.EXTENSION, // 0: block identifier
int extension, // 1: extension number
string data }) // 2: extension data
and possibly ended with one of these:
({ GIF.ERROR_PREMATURE_EOD }) // premature end-of-data
({ GIF.ERROR_TOO_MUCH_DATA, // data following end marker
string data }) // (rest of file)
({ GIF.ERROR_UNKNOWN_DATA, // unknown data
string data }) // (rest of file)
The decode method uses this data in a way similar to this program:
import Image;object my_decode_gif(string data) { array a=GIF._decode(data); object img=image(a[0],a[1]); foreach (a[4..],array b) if (b[0]==GIF.RENDER) if (b[4]) img->paste_alpha(b[3],b[4],b[1],b[2]); else img->paste(b[3],b[1],b[2]); return img; }
| argument(s) | description |
|
string gifdata | GIF data (with header and all) |
|
array __decoded | GIF data as from __decode |
This is in the very advanced sector of the GIF support; please read about how GIF files works.
| argument(s) | description |
|
array data | data as returned from _encode |
| argument(s) | description |
|
int transparency int transparency_index | The following image has transparency, marked with this index. |
|
int delay | View the following rendering for this many centiseconds (0..65535). |
|
int user_input | Wait the delay or until user input. If delay is zero, wait indefinitely for user input. May sound the bell upon decoding. |
|
int disposal | Disposal method number;
|
Most decoders just ignore some or all of these parameters.
| argument(s) | description |
|
int x int y | Position of this image. |
|
int xsize int ysize | Size of the image. Length if the indices string must be xsize*ysize. |
|
int bpp | Bits per pixels in the indices. Valid range 1..8. |
|
string indices | The image indices as an 8bit indices. |
|
string colortable | Colortable with colors to write as palette. If this argument is zero, no local colortable is written. Colortable string len must be 1<<bpp. |
|
int interlace | Interlace index data and set interlace bit. The given string should _not_ be pre-interlaced. |
({int xsize,int ysize, // 0: size of image drawing area
int numcol, // 2: suggested number of colors
void|string colortable, // 3: opt. global colortable
({ int aspx, int aspy, // 4,0: aspect ratio or 0, 0 if not set
int background }), // 1: index of background color
followed by any number these blocks in any order:
({ GIF.EXTENSION, // 0: block identifier
int extension, // 1: extension number
string data }) // 2: extension data
({ GIF.RENDER, // 0: block identifier
int x, int y, // 1: position of render
int xsize, int ysize, // 3: size of render
int interlace, // 5: interlace flag
void|string colortbl, // 6: opt. local colortable
int lzwsize, // 7: lzw code size
string lzwdata }) // 8: packed lzw data
and possibly ended with one of these:
({ GIF.ERROR_PREMATURE_EOD }) // premature end-of-data
({ GIF.ERROR_TOO_MUCH_DATA, // data following end marker
string data }) // (rest of file)
({ GIF.ERROR_UNKNOWN_DATA, // unknown data
string data }) // (rest of file)
This is in the very advanced sector of the GIF support; please read about how GIF files works.
The HRZ file is always 256x240 with RGB values from 0 to 63. No compression, no header, just the raw RGB data. HRZ is (was?) used for amatuer radio slow-scan TV.
The options argument may be a mapping containing zero or more encoding options:
normal options: "alpha":image object Use this image as mask (Note: ILBM mask is boolean. The values are calculated by (r+2g+b)/4>=128.)"palette":colortable object Use this as palette for pseudocolor encoding
Result is a mapping,
([ "image": object image,... more ... ])
image is the stored image.
({int xsize,int ysize, // 0: size of image drawing area
string bitmapheader, // 2: BMHD chunk
void|string colortable, // 3: opt. colortable chunk (CMAP)
void|string colortable, // 4: opt. colormode chunk (CAMG)
string body, // 5: BODY chunk
mapping more_chunks}) // 6: mapping with other chunks
The options argument may be a mapping containing zero or more encoding options:
normal options: "raw":1 Do not RLE encode the image "dpy":int "xdpy":int "ydpy":int Image resolution (in pixels/inch, integer numbers) "xoffset":int "yoffset":int Image offset (not used by most programs, but gimp uses it)
The options argument may be a mapping containing zero or more encoding options:
The options argument may be a mapping containing zero or more encoding options:
normal options: "alpha":image object Use this image as alpha channel (Note: PNG alpha channel is grey. The values are calculated by (r+2g+b)/4.)"palette":colortable object Use this as palette for pseudocolor encoding (Note: encoding with alpha channel and pseudocolor at the same time are not supported)
Result is a mapping,
([ "image": object image,... options ... ])
image is the stored image.
Valid entries in options is a superset of the one given to encode:
basic options:"alpha": object alpha, - alpha channel
"palette": object colortable, - image palette (if non-truecolor)
advanced options:
"background": array(int) color, - suggested background color "background_index": int index, - what index in colortable
"chroma": ({ float white_point_x, float white_point_y, float red_x, float red_y, - CIE x,y chromaticities float green_x, float green_y, float blue_x, float blue_y })
"gamma": float gamma, - gamma
"spalette": object colortable, - suggested palette, for truecolor images "histogram": array(int) hist, - histogram for the image, corresponds to palette index
"physical": ({ int unit, - physical pixel dimension int x,y }) unit 0 means pixels/meter
"sbit": array(int) sbits - significant bits
"text": array(array(string)) text - text information, ({ ({ keyword, data }), ... })
Standard keywords:
Title Short (one line) title or caption for image Author Name of image's creator Description Description of image (possibly long) Copyright Copyright notice Creation Time Time of original image creation Software Software used to create the image Disclaimer Legal disclaimer Warning Warning of nature of content Source Device used to create the image Comment Miscellaneous comment
"time": ({ int year, month, day, - time of last modification hour, minute, second })
wizard options: "compression": int method - compression method (0)
This method can also take options, as a mapping:
advanced options: "palette": colortable object - replace the decoded palette with this when unpacking the image data, if applicable
Result is an array of arrays, ({ ({ string chunk_type, string data, int crc_ok }), ({ string chunk_type, string data, int crc_ok }) ... })
chunk_type is the type of the chunk, like "IHDR" or "IDAT".
data is the actual chunk data.
crcok is set to 1 if the checksum is ok and dontcheckcrc parameter isn't set.
Returns 0 if it isn't a PNG file.
PNM is a common image storage format on unix systems, and is a very simple format.
This format doesn't use any color palette.
The format is divided into seven subformats;
P1(PBM) - ascii bitmap (only two colors) P2(PGM) - ascii greymap (only grey levels) P3(PPM) - ascii truecolor P4(PBM) - binary bitmap P5(PGM) - binary greymap P6(PPM) - binary truecolor
Simple encoding:
encode,
encode_binary,
encode_ascii
Simple decoding:
decode
Advanced encoding:
encode_P1,
encode_P2,
encode_P3,
encode_P4,
encode_P5,
encode_P6
encode_binary() and encode_ascii() uses the most optimized encoding for this image (bitmap, grey or truecolor) - P4, P5 or P6 respective P1, P2 or P3.
encode_P1/encode_P4
assumes the image is black and white. Use
Image.Image->threshold() or something like
Image.Colortable( ({({0,0,0}),({255,255,255})}) )
encode_P2/encode_P5 assumes the image is greyscale. Use Image.Image->grey() to get a greyscale image.
The options argument may be a mapping containing zero or more encoding options:
normal options: "alpha":image object Use this image as alpha channel (Note: Targa alpha channel is grey. The values are calculated by (r+2g+b)/4.)"raw":1 Do not RLE encode the image
The options argument may be a mapping containing zero or more encoding options.
normal options: "name":"xbm_image_name" The name of the XBM. Defaults to 'image'
Supported options:
([
"fg":({fgcolor}), // Foreground color. Default black
"bg":({bgcolor}), // Background color. Default white
"invert":1, // Invert the mask
])
The layer object have the following extra variables (to be queried using get_misc_value):
image_xres, image_yres, image_colormap, image_guides, image_parasites, name, parasites, visible, active
Supported options
([
"background":({r,g,b})||Image.Color object
"draw_all_layers":1,
Draw invisible layers as well
"draw_guides":1,
Draw the guides
"draw_selection":1,
Mark the selection using an overlay
"ignore_unknown_layer_modes":1
Do not asume 'Normal' for unknown layer modes.
"mark_layers":1,
Draw an outline around all (drawn) layers
"mark_layer_names":Image.Font object,
Write the name of all layers using the font object,
"mark_active_layer":1,
Draw an outline around the active layer
])
Returned structure referenceclass GimpImage { int width; int height; int compression; int type; int tattoo_state; float xres = 72.0; float yres = 72.0; int res_unit; Image.Colortable colormap; Image.Colortable meta_colormap; array(Layer) layers = ({}); array(Channel) channels = ({}); array(Guide) guides = ({}); array(Parasite) parasites = ({}); array(Path) paths = ({});
Layer active_layer; Channel active_channel; Channel selection; }
class Layer { string name; int opacity; int type; int mode; int tattoo; mapping flags = ([]); int width, height; int xoffset, yoffset; array (Parasite) parasites; LayerMask mask; Hierarchy image; }
class Channel { string name; int width; int height; int opacity; int r, g, b; int tattoo; Hierarchy image_data; object parent; mapping flags = ([]); array (Parasite) parasites; }
class Hierarchy { Image.Image img; Image.Image alpha; int width; int height; int bpp; }
class Parasite { string name; int flags; string data; }
class Guide { int pos; int vertical; }
class Path { string name; int ptype; int tattoo; int closed; int state; int locked; array (PathPoint) points = ({}); }
class PathPoint { int type; float x; float y; }
Structure reference([ "width":int, "height":int, "type":int, "properties":({ ([ "type":int, "data":string, ]), ... }), "layers":({ ([ "name":string, "width":int, "height":int, "type":type, "properties":({ ([ "type":int, "data":string, ]), ... }), "mask":0 || ([ "name":string, "width":int, "height":int, "properties":({ ([ "type":int, "data":string, ]), ... }), "image_data":([ "bpp":int, "width":int, "height":int, "tiles":({ string, ... }), ]), ]), "image_data":([ "bpp":int, "width":int, "height":int, "tiles":({ string, ... }), ]), ]), ... }), "channels":({ "name":string, "width":int, "height":int, "properties":({ ([ "type":int, "data":string, ]), ... }), "image_data":([ "bpp":int, "width":int, "height":int, "tiles":({ string, ... }), ]), }), ])
XWD is the output format for the xwd program.
Simple decoding:
decode
Advanced decoding:
_decode
Supported XWD visual classes and encoding formats are TrueColor / ZPixmap DirectColor / ZPixmap PseudoColor / ZPixmap
If someone sends me files of other formats, these formats may be implemented. :) /mirar@idonex.se
The options argument may be a mapping containing zero or more encoding options:
advanced options: "block_smoothing":0|1 Do interblock smoothing. Default is on (1). "fancy_upsampling":0|1 Do fancy upsampling of chroma components. Default is on (1). "method":JPEG.IFAST|JPEG.ISLOW|JPEG.FLOAT|JPEG.DEFAULT|JPEG.FASTEST DCT method to use. DEFAULT and FASTEST is from the jpeg library, probably ISLOW and IFAST respective.wizard options: "scale_num":1.. "scale_denom":1.. Rescale the image when read from JPEG data. My (Mirar) version (6a) of jpeglib can only handle 1/1, 1/2, 1/4 and 1/8.
_decode and decode_header gives a mapping as result, with this content:
"xsize":int "ysize":int size of image "xdpi":float "ydpi":float image dpi, if known "type":"image/jpeg" file type information as MIME typeJPEG specific: "num_compontents":int number of channels in JPEG image "color_space":"GRAYSCALE"|"RGB"|"YUV"|"CMYK"|"YCCK"|"UNKNOWN" color space of JPEG image "density_unit":int "x_density":int "y_density":int density of image; unit is 1:dpi 2:dpcm 0:no units "adobe_marker":0|1 if the file has an adobe marker
The options argument may be a mapping containing zero or more encoding options:
normal options: "quality":0..100 Set quality of result. Default is 75. "optimize":0|1 Optimize Huffman table. Default is on (1) for images smaller than 50kpixels. "progressive":0|1 Make a progressive JPEG. Default is off.advanced options: "smooth":1..100 Smooth input. Value is strength. "method":JPEG.IFAST|JPEG.ISLOW|JPEG.FLOAT|JPEG.DEFAULT|JPEG.FASTEST DCT method to use. DEFAULT and FASTEST is from the jpeg library, probably ISLOW and IFAST respective.
"density_unit":int "x_density":int "y_density":int density of image; unit is 1:dpi 2:dpcm 0:no units
wizard options: "baseline":0|1 Force baseline output. Useful for quality<25. Default is on for quality<25. "quant_tables":mapping(int,array(array(int))) Tune quantisation tables manually.
The options argument may be a mapping containing zero or more encoding options:
normal options: "compression":Image.TIFF.COMPRESSION_*, "name":"an image name", "comment":"an image comment", "alpha":An alpha channel, "dpy":Dots per inch (as a float), "xdpy":Horizontal dots per inch (as a float), "ydpy":Vertical dots per inch (as a float),
| argument(s) | description |
|
string filename | The filename of the TTF font or the TTC font collection. |
|
mapping options | advanced options: "face":int If opening a font collection, '.TTC', this is used to get other fonts than the first. |
The result from names() is a mapping, which has any or all of these indices:
"copyright": ("Copyright the Foo Corporation...bla bla")
"family": ("My Little Font")
"style": ("Bold")
"full": ("Foo: My Little Font: 1998")
"expose": ("My Little Font Bold")
"version": ("June 1, 1998; 1.00, ...")
"postscript": ("MyLittleFont-Bold")
"trademark": ("MyLittleFont is a registered...bla bla")
This is extracted from the information from _names(), and fit into pike-strings using unicode or iso-8859-1, if possible.
The result from _names() is a matrix, on this form:
({ ({ int platform, encoding, language, id, string name }),
({ int platform, encoding, language, id, string name }),
...
})
The most interesting item to look at may be ->num_Faces, which describes the number of faces in a .TTC font collection.
The options argument may be a mapping containing zero options.
"xsize":int "ysize":int size of image "type":"image/x-xface" file type information
The options argument may be a mapping containing zero options.
The img argument must be an image of the dimensions 48 by 48 pixels. All non-black pixels will be considered white.
The options argument may be a mapping containing zero options.
request_ok(object httpquery,...extra args) will be called when connection is complete, and headers are parsed.
request_fail(object httpquery,...extra args) is called if the connection fails.
variable int ok Tells if the connection is successfull. variable int errno Errno copied from the connection.
variable mapping headers Headers as a mapping. All header names are in lower case, for convinience.
variable string protocol Protocol string, ie "HTTP/1.0".
variable int status variable string status_desc Status number and description (ie, 200 and "ok").
variable mapping hostname_cache Set this to a global mapping if you want to use a cache, prior of calling *request().
variable mapping async_dns Set this to an array of Protocols.DNS.async_clients, if you wish to limit the number of outstanding DNS requests. Example: async_dns=allocate(20,Protocols.DNS.async_client)();
The query is executed in a background thread; call '() in this object to wait for the request to complete.
'query' is the first line sent to the HTTP server; for instance "GET /index.html HTTP/1.1".
headers will be encoded and sent after the first line, and data will be sent after the headers.
object(pseudofile) file() object(pseudofile) file(mapping newheaders,void|mapping removeheaders) object(pseudofile) datafile(); Gives back a pseudo-file object, with the method read() and close(). This could be used to copy the file to disc at a proper tempo.
datafile() doesn't give the complete request, just the data.
newheaders, removeheaders is applied as: (oldheaders|newheaders))-removeheaders Make sure all new and remove-header indices are lower case.
void async_fetch(function done_callback); Fetch all data in background.
options is a mapping of options,
([
"login" : int|string login as this person number
(get number from name)
"create" : string
create a new person and login with it
"password" : string send this login password
"invisible" : int(0..1) if set, login invisible
advanced
"port" : int(0..65535) server port (default is 4894)
"whoami" : string present as this user
(default is from uid/getpwent and hostname)
])
if "callback" are given, this function will be called when the text is created, with the text as first argument. Otherwise, the new text is returned.
options is a mapping that may contain:
([
"recpt" : Conference|array(Conference)
recipient conferences
"cc" : Conference|array(Conference)
cc-recipient conferences
"bcc" : Conference|array(Conference)
bcc-recipient conferences *
"comm_to" : Text|array(Text)
what text(s) is commented
"foot_to" : Text|array(Text)
what text(s) is footnoted
"anonymous" : int(0..1)
send text anonymously
])
options is a mapping that may contain:
([ "recpt" : Conference recipient conference ])
The first method is a synchronous call. This will send the command, wait for the server to execute it, and then return the result.
The last two is asynchronous calls, returning the initialised request object.
variable int protocol_level variable string session_software variable string software_version Description of the connected server.
([
"login" : int|string login as this person number
(get number from name)
"password" : string send this login password
"invisible" : int(0..1) if set, login invisible
advanced
"port" : int(0..65535) server port (default is 4894)
"whoami" : string present as this user
(default is from uid/getpwent and hostname)
])
variable int ok tells if the call is executed ok variable object error how the call failed The call is completed if (ok||error).
({
string hostname [0] hostname
array(string) ip [1] ip number(s)
array(string) ip [2] dns name(s)
})
Please note that these functions are available globally, you do not
need to import System to use these functions.
This function only exists on systems that have the chroot(2)
system call.
The second variant only works on systems that also have
the fchroot(2) system call.
The returned array contains the same information as that returned
by gethostbyname().
The array contains three elements:
The first element is the hostname.
The second element is an array(string) of IP numbers for the host.
The third element is an array(string) of aliases for the host.
The ident argument specifies an identifier to tag all log entries
with.
options is a bit field specifying the behavior of the message
logging. Valid options are:
facility specifies what subsystem you want to log as. Valid
facilities are:
The mapping contains the following fields:
int chroot(object(File) obj);
LOG_PID Log the process ID with each message. LOG_CONS Write messages to the console if they can't be sent to syslogd. LOG_NDELAY Open the connection to syslogd now and not later. LOG_NOWAIT Do not wait for subprocesses talking to syslogd.
LOG_AUTH Authorization subsystem LOG_AUTHPRIV LOG_CRON Crontab subsystem LOG_DAEMON System daemons LOG_KERN Kernel subsystem (NOT USABLE) LOG_LOCAL For local use LOG_LOCAL[1-7] For local use LOG_LPR Line printer spooling system LOG_MAIL Mail subsystem LOG_NEWS Network news subsystem LOG_SYSLOG LOG_USER LOG_UUCP UUCP subsystem
"sysname": Operating system name "nodename": "release": "version": "machine": Host name Release of this OS Version number of this OS Machine architecture
.(["env" : getenv() + (["TERM":"vt100"])
|
args is per default no argument(s),
env is reset to the given mapping, or kept if the argument is 0. fds is your stdin, stdout and stderr. Default is local pipes (see stdin et al). fds_to_close is file descriptors that are closed in the forked branch when the program is executed (ie, the other end of the pipes).
A regular expression is actually a string, then compiled into an object. The string contains characters that make up a pattern for other strings to match. Normal characters, such as A through Z only match themselves, but some characters have special meaning.
|
|
Note that \ can be used to quote these characters in which case they match themselves, nothing else. Also note that when quoting these something in Pike you need two \ because Pike also uses this character for quoting.
To make make regexps fast, they are compiled in a similar way that Pike is, they can then be used over and over again without needing to be recompiled. To give the user full control over the compilations and use of regexp an object oriented interface is provided.
You might wonder what regexps are good for, hopefully it should be more clear
when you read about the following functions:
void create(string regexp);
object(Regexp) Regexp();
object(Regexp) Regexp(string regexp);
The Gmp library can handle large integers, floats and rational numbers, but
currently Pike only has support for large integers. The others will be added
later or when demand arises. Large integers are implemented as objects cloned
from Gmp.Mpz.
The mpz object implements all the normal integer operations.
(except xor) There are also some extra operators:
object Mpz(int|object|float i);
object Mpz(string digits, int base);
(string) mpz
(int) mpz
(float) mpz
string digits(int|void base);
string size(int|void base);
This is the an interface to the gdbm library. This module might or
might not be available in your Pike depending on whether the gdbm library
was available on your system when Pike was compiled.
int create(string file);
int create(string file, string mode);
object(Gdbm) Gdbm();
object(Gdbm) Gdbm(string file);
object(Gdbm) Gdbm(string file, string mode);
r open database for reading w open database for writing c create database if it does not exist t overwrite existing database f fast mode
The fast mode prevents the database from synchronizing each change in the database immediately. This is dangerous because the database can be left in an unusable state if Pike is terminated abnormally.
The default mode is "rwc".
mixed find_option(array(string) argv,
Also, as an extra bonus: shortform, longform and envvar can all be arrays, in which case either of the options in the array will be accpted.
/* This program tests two different options. One is called -f or * --foo and the other is called -b or --bar and can also be given * by using the BAR_OPTION environment variable. */
int main(int argc, array(string) argv)
{
if(find_option(argv,"f","foo"))
werror("The FOO option was given.\n");
werror("The BAR option got the "+
find_option(argv,"b","bar","BAR_OPTION","default")+
" argument.\n");
}
Each element in the array options should be an array on the following form:
> Getopt.find_all_options(({"test","-dd"}),
>> ({ ({ "debug", Getopt.NO_ARG, ({"-d","--debug"}), "DEBUG", 1}) }));
Result: ({
({ "debug", 1 }),
({ "debug", 1 })
})
This is what it would look like in real code:
import Getopt;
int debug=0;
int main(int argc, array(string) argv
{
foreach(find_all_options(argv, ({
({ "debug", MAY_HAVE_ARG, ({"-d","--debug"}), "DEBUG", 1}),
({ "version", NO_ARG, ({"-v","--version" }) }) })),
mixed option)
{
switch(option[0])
{
case "debug": debug+=option[1]; break;
case "version":
write("Test program version 1.0\n");
exit(1);
}
}
argv=Getopt.get_args(argv);
}
int main(int argc, array(string) argv)
{
if(find_option(argv,"f","foo"))
werror("The FOO option was given.\n");
argv=get_args(argv);
werror("The arguments are: "+(argv*" ")+".\n");
}
This function can also be used to re-initialize a Gz.deflate object
so it can be re-used.
object(Gz.deflate) Gz.deflate(int X)
Gz.NO_FLUSH Only data that doesn't fit in the internal buffers is returned. Gz.PARTIAL_FLUSH All input is packed and returned. Gz.SYNC_FLUSH All input is packed and returned. Gz.FINISH All input is packed and an 'end of data' marker is appended.
Using flushing will degrade packing. Normally NO_FLUSH should be used until the end of the data when FINISH should be used. For interactive data PARTIAL_FLUSH should be used.
// streaming (blocks)
function inflate=Gz.inflate()->inflate;
while(string s=stdin->read(8192))
If there is no YP server available for the domain, this function call will block until there is one. If no server appears in about ten minutes or so, an error will be returned. The timeout is not configurable from the C interface to Yp either.
If no domain is given, the default domain will be used. (As returned by Yp.default_yp_domain)
arguments is the map Yp-map to search in. This must be a full map name, for example, you should use passwd.byname instead of just passwd. key is the key to search for. The key must match exactly, no pattern matching of any kind is done.
object dom = Yp.YpDomain();
write(dom->match("passwd.byname", "root"));
If there is no YP server available for the domain, this function call will block until there is one. If no server appears in about ten minutes or so, an error will be returned. The timeout is not configurable from the C-yp interface either. map is the YP-map to bind to. This must be the full map name, as an example, passwd.byname instead of just passwd. If no domain is specified, the default domain will be used. This is usually best.
import Yp;
void print_entry(string key, string val)
{
val = (val/":")[4];
if(strlen(val))
{
string q = ".......... ";
werror(key+q[strlen(key)..]+val+"\n");
}
}
void main(int argc, array(string) argv)
{
object (YpMap) o = YpMap("passwd.byname");
werror("server.... "+ o->server() + "\n"
"age....... "+ (-o->order()+time()) + "\n"
"per....... "+ o["per"] + "\n"
"size...... "+ sizeof(o) + "\n");
o->map(print_entry); // Print username/GECOS pairs
}
All column references are case insensitive. A column can be referred to by its position (starting from zero). All operations are non-destructive. That means that a new table object will be returned after, for example, a sort.
An example is available at the end of this section.
object t = ADT.Table.table( ({ ({ "Blixt", "Gordon" }),
({ "Buck", "Rogers" }) }),
({ "First name", "Last name" }) );
object group(funcion f, array(string|int)|string|int columns, mixed ... arg);
array(string) cols = ({ "Fruit", "Provider", "Quantity" });
array(mapping) types = ({ 0, 0, ([ "type":"num" ]) });
array(array) table = ({ ({ "Avocado", "Frukt AB", 314 }),
({ "Banana", "Banankompaniet", 4276 }),
({ "Orange", "Frukt AB", 81 }),
({ "Banana", "Frukt AB", 1174 }),
({ "Orange", "General Food", 523 }) });
object t = ADT.Table.table(table, cols, types);
write("FRUITS\n\n");
write(ADT.Table.ASCII.encode(t, ([ "indent":4 ])));
write("\nPROVIDERS\n\n");
write(ADT.Table.ASCII.encode(t->select("provider", "quantity")->
sum("quantity")->rsort("quantity")));
write("\nBIG PROVIDERS\n\n"+
ADT.Table.ASCII.encode(t->select("provider", "quantity")->
sum("quantity")->
where("quantity", `>, 1000)->
rsort("quantity")));
write("\nASSORTMENT\n\n");
write(ADT.Table.ASCII.encode(t->select("fruit")->distinct("fruit")->
sort("fruit"), ([ "indent":4 ])));
Some effort has been made to make sure that Yabu is crash safe. This means that the database should survive process kills, core dumps and such -- although this is not something that can be absolutely guaranteed. Also, all non-commited and pending transactions will be cancelled in case of a crash.
Yabu uses three types of objects, listed below:
A simple example is illustrated below.
// Create a database called "my.database" in write/create mode.
object db = Yabu.db("my.database", "wc");
// Create a table called "fruit".
object table = db["fruit"];
// Store a record called "orange" with the value "yummy".
table["orange"] = "yummy";
// Store a record called "apple" with the value 42.
table["apple"] = 42;
Transactions are slightly more complex, but not much so. See example below.
// Create a database called "my.database"
// in write/create/transaction mode.
object db = Yabu.db("my.database", "wct");
// Create a table called "fruit".
object table = db["fruit"];
// Create a transaction object for table "fruit".
object transaction = table->transaction();
// Store a record called "orange" with
// the value "yummy". Note that this record
// is only visible through the transaction object.
transaction["orange"] = "yummy";
// Store a record called "apple" with the value 42.
// As with "orange", this record is invisible
// for all objects except this transaction object.
transaction["apple"] = 42;
// Commit the records "orange" and "apple".
// These records are now a part of the database.
transaction->commit();
A Yabu database can operate in two basic modes:
// Open a database in create/write/transaction mode.
object db = Yabu.db("my.database", "cwt");
// Open a database in read mode.
object db = Yabu.db("my.database", "r");
// Open a database in create/write/compress mode.
object db = Yabu.db("my.database", "cwC");
object(table) `[](string table_name);
array(string) _indices();
This method returns a transaction object.
Rollbacks always succeeds. However, with commit that is not always the case. A commit will fail if:
The Message class does not make any interpretation of the body data, unless
the content type is multipart. A multipart message contains several
individual messages separated by boundary strings. The create
method of the Message class will divide a multipart body on these boundaries,
and then create individual Message objects for each part. These objects
will be collected in the array body_parts within the original
Message object. If any of the new Message objects have a body of type
multipart, the process is of course repeated recursively. The following
figure illustrates a multipart message containing three parts, one of
which contains plain text, one containing a graphical image, and the third
containing raw uninterpreted data:
The result is returned in the form of an array containing two elements.
The first element is a mapping containing the headers found. The second
element is a string containing the body.
Should the function succeed in reconstructing the original message, a
new MIME.Message object is returned. Note that this message may
in turn be a part of another, larger, fragmented message.
If the function fails to reconstruct an original message, it returns an
integer indicating the reason for its failure:
The set of special-characters is the one specified in RFC1521 (i.e. "<",
">", "@", ",", ";", ":", "\", "/", "?", "="), and not the one
specified in RFC822.
14.11.1 Global functions
The encoding string is not case sensitive.
> Array.map("=?iso-8859-1?b?S2lscm95?= was =?us-ascii?q?h=65re?="/" ",
MIME.decode_word);
Result: ({ /* 3 elements */
({ /* 2 elements */
"Kilroy",
"iso-8859-1"
}),
({ /* 2 elements */
"was",
0
}),
({ /* 2 elements */
"here",
"us-ascii"
})
})
void|int no_linebreaks);
The encoding string is not case sensitive. For the x-uue encoding,
an optional filename string may be supplied. If a nonzero value is passed
as no_linebreaks, the result string will not contain any linebreaks
(base64 and quoted-printable only).
> MIME.encode_word( ({ "Quetzalcoatl", "iso-8859-1" }), "base64" );
Result: =?iso-8859-1?b?UXVldHphbGNvYXRs?=
> MIME.encode_word( ({ "Foo", 0 }), "base64" );
Result: Foo
type subtype text plain message rfc822 multipart mixed
> MIME.quote( ({ "attachment", ';', "filename", '=', "/usr/dict/words" }) );
Result: attachment;filename="/usr/dict/words"
This function will analyze a string containing the header value, and produce
an array containing the lexical elements. Individual special characters
will be returned as characters (i.e. ints). Quoted-strings,
domain-literals and atoms will be decoded and returned as strings.
Comments are not returned in the array at all.
> MIME.tokenize("multipart/mixed; boundary=\"foo/bar\" (Kilroy was here)");
Result: ({ /* 7 elements */
"multipart",
47,
"mixed",
59,
"boundary",
61,
"foo/bar"
})
> object msg = MIME.Message( "Hello, world!",
([ "MIME-Version" : "1.0",
"Content-Type":"text/plain",
"Content-Transfer-Encoding":"base64" ]) );
Result: object
> (string )msg;
Result: Content-Type: text/plain
Content-Length: 20
Content-Transfer-Encoding: base64
MIME-Version: 1.0
SGVsbG8sIHdvcmxkIQ==
> object msg = MIME.Message( "Hello, world!", ([ "MIME-Version" : "1.0", "Content-Type" : "text/plain; charset=iso-8859-1" ]) ); Result: object > msg->charset; Result: iso-8859-1
Simulate inherits the Array, Stdio, String and Process modules, so
importing he Simulate module also imports all identifiers from these
modules. In addition, these functions are available:
This function is the same as multiplication.
array filter_array(array(object) arr,string fun,mixed ... args);
array filter_array(array(function) arr,-1,mixed ... args);
Result: foo-bar-gazonk
> ({ "a","b","c" })*" and ";
Result: a and b and c
>
array map_array(array(object) arr,string fun,mixed ... args);
array map_array(array(function) arr,-1,mixed ... arg);
float sum(float ... f);
string sum(string|float|int ... p);
array sum(array ... a);
mapping sum(mapping ... m);
list sum(multiset ... l);
void add_efun(string func_name)
> mklist( ({1,2,3}) );
Result: (< /* 3 elements */
1,
2,
3
>)
| argument(s) | description |
|
string q | The SQL query This function sends an SQL query to the Mysql-server. The result of the query is returned as a Mysql.mysql_result object. Returns 0 if the query didn't return any result (e.g. INSERT or similar). |
| argument(s) | description |
|
string database | Name of the database to be created This function creates a new database in the Mysql-server. |
| argument(s) | description |
|
string database | Name of database to be dropped This function drops a database from a Mysql-server. |
"name": string The name of the field. "table": string The name of the table. "default": string The default value for the field. "type": string The type of the field. "length": int The length of the field. "max_length": int The length of the longest element in this field. "flags": multiset(string) Some flags. "decimals": int The number of decimalplaces.The type of the field can be any of: "decimal", "char", "short", "long", "float", "double", "null", "time", "longlong", "int24", "tiny blob", "medium blob", "long blob", "var string", "string" or "unknown". The flags multiset can contain any of "primary_key": This field is part of the primary key for this table. "not_null": This field may not be NULL. "blob": This field is a blob field.
| argument(s) | description |
|
string table | Name of table to list the fields of |
|
string wild | Wildcard to filter the result with |
show fields in 'table' like "wild"
| argument(s) | description |
|
string wild | Wildcard to filter with. Returns a table containing the names of all tables in the current database. If an argument is given, only those matching wild are returned. |
int main()
{
write(mysql()->statistics());
return(0);
}
although most applications will not use the Crypto.des class directly.Crypto.des()->set_encrypt_key(Crypto.hex_to_string("0123456789abcdef"))
->crypt_block("Pike DES")
Crypto.md5()->update(s)->digest()
to convert it a DER-encoded ASN.1 bitstring.Standards.ASN1.Types.asn1_bit_string(rsa->sign(...))->get_der()
If domainname is a non-empty string and has been bound previously, bindtextdomain() replaces the old binding with dirname. The dirname argument can be an absolute or relative pathname being resolved when gettext(), dgettext(), or dcgettext() are called. If domainname is null pointer or an empty string, bindtextdomain() returns 0. User defined domain names cannot begin with the string SYS_. Domain names beginning with this string are reserved for system use. The return value from bindtextdomain() is a string containing dirname or the directory binding associated with domainname if dirname is void. If no binding is found, the default locale path is returned. If domainname is void or an empty string, bindtextdomain() takes no action and returns a 0.
| argument(s) | description |
|
string domainname | The domain to query or bind a path to. |
|
string dirname | The directory name to bind to the choosen domain. |
| argument(s) | description |
|
string domain | The domain to lookup the message in. |
|
string msg | The message to translate. |
|
int category | The category which locale should be used. |
| argument(s) | description |
|
string domain | The domain to lookup the message in. |
|
string msg | The message to translate. |
| argument(s) | description |
|
string msg | The message to translate. |
string decimal_point: The decimal-point character used to format non-monetary quantities.
string thousands_sep: The character used to separate groups of digits to the left of the decimal-point character in formatted non-monetary quantities.
string int_curr_symbol: The international currency symbol applicable to the current locale, left-justified within a four-character space-padded field. The character sequences should match with those specified in ISO 4217 Codes for the Representation of Currency and Funds.
string currency_symbol: The local currency symbol applicable to the current locale.
string mon_decimal_point: The decimal point used to format monetary quantities.
string mon_thousands_sep: The separator for groups of digits to the left of the decimal point in formatted monetary quantities.
string positive_sign: The string used to indicate a non-negative-valued formatted monetary quantity.
string negative_sign: The string used to indicate a negative-valued formatted monetary quantity.
int int_frac_digits: The number of fractional digits (those to the right of the decimal point) to be displayed in an internationally formatted monetary quantity.
int frac_digits: The number of fractional digits (those to the right of the decimal point) to be displayed in a formatted monetary quantity.
int p_cs_precedes: Set to 1 or 0 if the currency_symbol respectively precedes or succeeds the value for a non-negative formatted monetary quantity.
int p_sep_by_space: Set to 1 or 0 if the currency_symbol respectively is or is not separated by a space from the value for a non-negative formatted monetary quantity.
int n_cs_precedes: Set to 1 or 0 if the currency_symbol respectively precedes or succeeds the value for a negative formatted monetary quantity.
int n_sep_by_space: Set to 1 or 0 if the currency_symbol respectively is or is not separated by a space from the value for a negative formatted monetary quantity.
int p_sign_posn: Set to a value indicating the positioning of the positive_sign for a non-negative formatted monetary quantity. The value of p_sign_posn is interpreted according to the following:
0 - Parentheses surround the quantity and currency_symbol.
1 - The sign string precedes the quantity and currency_symbol.
2 - The sign string succeeds the quantity and currency_symbol.
3 - The sign string immediately precedes the currency_symbol.
4 - The sign string immediately succeeds the currency_symbol.
int n_sign_posn: Set to a value indicating the positioning of the negative_sign for a negative formatted monetary quantity. The value of n_sign_posn is interpreted according to the rules described under p_sign_posn.
If locale is "", the locale is set to the default locale which is selected from the environment variable LANG.
The argument category determines which functions are influenced by the new locale: Locale.Gettext.LC_ALL for all of the locale.
Locale.Gettext.LC_COLLATE for the functions strcoll() and strxfrm() (used by pike, but not directly accessible).
Locale.Gettext.LC_CTYPE for the character classification and conversion routines.
Locale.Gettext.LC_MONETARY for localeconv(). Locale.Gettext.LC_NUMERIC for the decimal character. Locale.Gettext.LC_TIME for strftime() (currently not accessible from Pike).
| argument(s) | description |
|
int category | The category in which to set the locale. |
|
string locale | The locale to change to |
The domainname argument is the unique name of a domain on the system. If there are multiple versions of the same domain on one system, namespace collisions can be avoided by using bindtextdomain(). If textdomain() is not called, a default domain is selected. The setting of domain made by the last valid call to textdomain() remains valid across subsequent calls to setlocale, and gettext(). The normal return value from textdomain() is a string containing the current setting of the domain. If domainname is void, textdomain() returns a string containing the current domain. If textdomain() was not previously called and domainname is void, the name of the default domain is returned.
| argument(s) | description |
|
string domainname | The name of the domain to be made the current domain. |
Ie:
array(string) lesser() - gives back a list of possible xxx's. object xxxs() - gives back a list of possible n's. object xxx(mixed n) - gives back xxx n object xxx(object(Xxx) o) - gives back the corresponing xxx
The list of n's (as returned from xxxs) are always in order.
There are two n's with special meaning, 0 and -1. 0 always gives the first xxx, equal to my_obj->xxx(my_obj->xxxs()[0]), and -1 gives the last, equal to my_obj->xxx(my_obj->xxxs()[-1]).
To get all xxxs in the object, do something like Array.map(my_obj->xxxs(),my_obj->xxx).
xxx(object) may return zero, if there was no correspondning xxx.
Lesser units: Month, Week, Day Greater units: none
function datetime(int|void unix_time) Replacement for localtime.
function datetime_name(int|void unix_time) Replacement for ctime.
function datetime_short_name(int|void unix_time) Replacement for ctime.
It can only - for speed and simplicity - hold floating point numbers and are only in 2 dimensions.
The normal operation is to create the matrix object with a double array, like Math.Matrix( ({({1,2}),({3,4})}) ).
Another use is to create a special type of matrix, and this is told as third argument.
Currently there are only the "identity" type, which gives a matrix of zeroes except in the diagonal, where the number one (1.0) is. This is the default, too.
The third use is to give all indices in the matrix the same value, for instance zero or 42.
The forth use is some special matrixes. First the square identity matrix again, then the rotation matrix.
This equals |A| or sqrt( A02 + A12 + ... + An2 ).
It is only usable with 1xn or nx1 matrices.
m->normv() is equal to m*(1.0/m->norm()), with the exception that the zero vector will still be the zero vector (no error).
Ie:
array(string) lesser() - gives back a list of possible xxx's. object xxxs() - gives back a list of possible n's. object xxx(mixed n) - gives back xxx n object xxx(object(Xxx) o) - gives back the corresponing xxx
The list of n's (as returned from xxxs) are always in order.
There are two n's with special meaning, 0 and -1. 0 always gives the first xxx, equal to my_obj->xxx(my_obj->xxxs()[0]), and -1 gives the last, equal to my_obj->xxx(my_obj->xxxs()[-1]).
To get all xxxs in the object, do something like Array.map(my_obj->xxxs(),my_obj->xxx).
xxx(object) may return zero, if there was no correspondning xxx.
Lesser units: Month, Week, Day Greater units: none
function datetime(int|void unix_time) Replacement for localtime.
function datetime_name(int|void unix_time) Replacement for ctime.
function datetime_short_name(int|void unix_time) Replacement for ctime.
variable float lat variable float long Longitude (W--E) and latitude (N--S) of the position, float value in degrees. Positive number is north and east, respectively. Negative number is south and west, respectively.
n format - 17°42.19'N 42°22.2'W 1 17.703°N 42.37°W 2 17°42.18'N 42°22.2'W 3 17°42'10.4"N 42°22'12"W -1 17.703 -42.37
And that USA has three domains, Great Britain two:
> Geographical.Countries.se; Result: Country(Sweden) > Geographical.Countries.djibouti; Result: Country(Djibouti) > Geographical.Countries.com; Result: Country(United States) > Geographical.Countries.wallis_and_futuna_islands->iso2; Result: "WF"
It's used like this:
array res=Parser.SGML()->feed(string)->finish()->result();
The resulting structure is an array of atoms, where the atom can be a string or a tag. A tag contains a similar array, as data.
Example: A string "<gat> <gurka> </gurka> <banan> <kiwi> </gat>" results in
({
tag "gat" object with data:
({
tag "gurka" object with data:
({
" "
})
tag "banan" object with data:
({
" "
tag "kiwi" object with data:
({
" "
})
})
})
})
ie, simple "tags" (not containers) are not detected, but containers are ended implicitely by a surrounding container _with_ an end tag.
The 'tag' is an object with the following variables:
string name; - name of tag mapping args; - argument to tag int line,char,column; - position of tag string file; - filename (see create) array(SGMLatom) data; - contained data
Both finish() and result() returns the computed data.
feed() returns the called object.
Example:
> Protocols.HTTP.http_encode_query( (["anna":"eva","lilith":"blue"]) ); Result: "lilith=blue&anna=eva" > Protocols.HTTP.http_encode_query( (["&":"&","'=\"":"\0\0\0"]) ); Result: "%26amp%3b=%26&%27%3d%22=%00%00%00"
Do not use this function to protect URLs, since it will protect URL characters like '/' and '?'.
request_ok(object httpquery,...extra args) will be called when connection is complete, and headers are parsed.
request_fail(object httpquery,...extra args) is called if the connection fails.
variable int ok Tells if the connection is successfull. variable int errno Errno copied from the connection.
variable mapping headers Headers as a mapping. All header names are in lower case, for convinience.
variable string protocol Protocol string, ie "HTTP/1.0".
variable int status variable string status_desc Status number and description (ie, 200 and "ok").
variable mapping hostname_cache Set this to a global mapping if you want to use a cache, prior of calling *request().
variable mapping async_dns Set this to an array of Protocols.DNS.async_clients, if you wish to limit the number of outstanding DNS requests. Example: async_dns=allocate(20,Protocols.DNS.async_client)();
The query is executed in a background thread; call '() in this object to wait for the request to complete.
'query' is the first line sent to the HTTP server; for instance "GET /index.html HTTP/1.1".
headers will be encoded and sent after the first line, and data will be sent after the headers.
object(pseudofile) file() object(pseudofile) file(mapping newheaders,void|mapping removeheaders) object(pseudofile) datafile(); Gives back a pseudo-file object, with the method read() and close(). This could be used to copy the file to disc at a proper tempo.
datafile() doesn't give the complete request, just the data.
newheaders, removeheaders is applied as: (oldheaders|newheaders))-removeheaders Make sure all new and remove-header indices are lower case.
void async_fetch(function done_callback); Fetch all data in background.
options is a mapping of options,
([
"login" : int|string login as this person number
(get number from name)
"create" : string
create a new person and login with it
"password" : string send this login password
"invisible" : int(0..1) if set, login invisible
advanced
"port" : int(0..65535) server port (default is 4894)
"whoami" : string present as this user
(default is from uid/getpwent and hostname)
])
if "callback" are given, this function will be called when the text is created, with the text as first argument. Otherwise, the new text is returned.
options is a mapping that may contain:
([
"recpt" : Conference|array(Conference)
recipient conferences
"cc" : Conference|array(Conference)
cc-recipient conferences
"bcc" : Conference|array(Conference)
bcc-recipient conferences *
"comm_to" : Text|array(Text)
what text(s) is commented
"foot_to" : Text|array(Text)
what text(s) is footnoted
"anonymous" : int(0..1)
send text anonymously
])
options is a mapping that may contain:
([ "recpt" : Conference recipient conference ])
The first method is a synchronous call. This will send the command, wait for the server to execute it, and then return the result.
The last two is asynchronous calls, returning the initialised request object.
variable int protocol_level variable string session_software variable string software_version Description of the connected server.
([
"login" : int|string login as this person number
(get number from name)
"password" : string send this login password
"invisible" : int(0..1) if set, login invisible
advanced
"port" : int(0..65535) server port (default is 4894)
"whoami" : string present as this user
(default is from uid/getpwent and hostname)
])
variable int ok tells if the call is executed ok variable object error how the call failed The call is completed if (ok||error).
({
string hostname [0] hostname
array(string) ip [1] ip number(s)
array(string) ip [2] dns name(s)
})
It currently works similar to old C preprocessors but has a few extra features. This chapter describes the different preprocessor directives. This is what it can do:
#"Foo bar"is the same as
"Foo\nbar"
#define A "test"
#define B 17
#define C(X) (X)+(B)+"\n"
#define W write
#define Z Stdio.stdout
int main()
{
Z->W(C(A));
}
This puts the file index.html into the string html_doc.string html_doc=#string "index.html";
As a side-effect, this function sets the value returned by time(1) to the current time.
Calling add_constant without a value will remove that name from the list of constants. As with replacing, this will not affect already compiled programs.
array aggregate(mixed ... elems) { return elems; }
multiset aggregate(mixed ... elems) { return mkmultiset(elems); }
The only problem is that mkmultiset is implemented using aggregate_multiset...
If seconds is zero, no new alarm is scheduled.
In any event any previously set alarm is canceled.
({
| file, | /* a string with the filename if known, else zero */ |
| line, | /* an integer containing the line if known, else zero */ |
| function, | /* The function pointer to the called function */ |
| mixed|void ..., | /* The arguments the function was called with */ |
The current call frame will be last in the array, and the one above that the last but one and so on.
({
| time_left, | /* an int */ |
| caller, | /* the object that made the call out */ |
| function, | /* the function to be called */ |
| arg1, | /* the first argument, if any */ |
| arg2, | /* the second argument, if any */ |
| ... | /* and so on... */ |
Except of course it is a lot shorter and faster. That is, it indices every index in the array data on the value of the argument index and returns an array with the results.map_array(data, lambda(mixed x,mixed y) { return x[y]; }, index)
> column( ({ ({1,2}), ({3,4}), ({5,6}) }), 1)
Result: ({2, 4, 6})
Almost any value can be coded, mappings, floats, arrays, circular structures etc. At present, objects, programs and functions cannot be saved in this way. This is being worked on.
Note that this function is more restrictive than encode_value() with respect to the types of values it can encode. It will throw an error if it can't encode to a canonical form.
For instance, enumerate(4) gives ({0,1,2,3}).
Advanced use: the resulting array is caluculated like this:
array enumerate(int n,mixed step,mixed start,function operator)
{
array res=({});
for (int i=0; i<n; i++)
{
res+=({start});
start=operator(start,step);
}
return res;
}
The default values is step=1, start=0, operator=add.
({
int mode [0] file mode, protection bits etc. etc.
int size [1] file size for regular files,
-2 for dirs,
-3 for links,
-4 for otherwise
int atime [2] last access time
int mtime [3] last modify time
int ctime [4] last status time change
int uid [5] The user who owns this file
int gid [6] The group this file belongs to
})
If you give 1 as a second argument, file_stat does not follow links.If there is no such file or directory, zero is returned.
|
Some operating systems have problems if this function is used together with threads.
search(indices(haystack), index) != -1
For strings, has_value is equivalent to:search(values(haystack), value) != -1
search(haystack, value) != -1
Some signals and their supposed purpose:
| SIGHUP | Hang-up, sent to process when user logs out |
| SIGINT | Interrupt, normally sent by ctrl-c |
| SIGQUIT | Quit, sent by ctrl-\ |
| SIGILL | Illegal instruction |
| SIGTRAP | Trap, mostly used by debuggers |
| SIGABRT | Aborts process, can be caught, used by Pike whenever something goes seriously wrong. |
| SIGBUS | Bus error |
| SIGFPE | Floating point error (such as division by zero) |
| SIGKILL | Really kill a process, cannot be caught |
| SIGUSR1 | Signal reserved for whatever you want to use it for. |
| SIGSEGV | Segmentation fault, caused by accessing memory where you shouldn't. Should never happen to Pike. |
| SIGUSR2 | Signal reserved for whatever you want to use it for. |
| SIGALRM | Signal used for timer interrupts. |
| SIGTERM | Termination signal |
| SIGSTKFLT | Stack fault |
| SIGCHLD | Child process died |
| SIGCONT | Continue suspended |
| SIGSTOP | Stop process |
| SIGSTP | Suspend process |
| SIGTTIN | tty input for background process |
| SIGTTOU | tty output for background process |
| SIGXCPU | Out of CPU |
| SIGXFSZ | File size limit exceeded |
| SIGPROF | Profile trap |
| SIGWINCH | Window change signal |
Note that you have to use signame to translate the name of a signal to its number.
When a module is loaded the functions init_module_efuns and init_module_programs are called to initialize it. When Pike exits exit_module is called in all dynamically loaded modules. These functions _must_ be available in the module.
Please see the source and any examples available at ftp://www.idonex.se/pub/pike for more information on how to write modules for Pike in C.
([ "sec" : int(0..59) seconds over the minute "min" : int(0..59) minutes over the hour "hour" : int(0..59) what hour in the day "mday" : int(1..31) day of the month "mon" : int(0..11) what month "year" : int(0..) years since 1900 "wday" : int(0..6) day of week (0=Sunday) "yday" : int(0..365) day of year "isdst" : int(0..1) is daylight saving time "timezone" : int difference between local time and UTC ])
advanced use is a wide combination of types given as "arr" or "fun".
|
This function returns the value from the key-value pair that was removed from the mapping.
> man( 1,2,3 );
Result: 3
> min( 1,2,3 );
Result: 1
> mkmultiset( ({1,2,3}) );
Result: (< /* 3 elements */
1,
2,
3
>)
| year | The number of years since 1900 |
| mon | The month |
| mday | The day of the month. |
| hour | The number of hours past midnight |
| min | The number of minutes after the hour |
| sec | The number of seconds after the minute |
| isdst | If this is 1, daylight savings time is assumed |
| tm | The timezone (-12 <= tz <= 12) |
Or you can just send them all on one line as the second syntax suggests.
/* This example calls shutting_down() in all cloned objects */
object o;
for(o=next_object();o;o=next_object(o))
o->shutting_down();
map_array(index,lambda(mixed x,mixed y) { return y[x]; },data)
Except of course it is a lot shorter and faster. That is, it indices data on every index in the array index and returns an array with the results.
0: user time 1: system time 2: maxrss 3: idrss 4: isrss 5: minflt 6: minor page faults 7: major page faults 8: swaps 9: block input op. 10: block output op. 11: messages sent 12: messages received 13: signals received 14: voluntary context switches 15: involuntary context switches 16: sysc 17: ioch 18: rtime 19: ttime 20: tftime 21: dftime 22: kftime 23: ltime 24: slptime 25: wtime 26: stoptime 27: brksize 28: stksize
Don't ask me to explain these values, read your system manuals for more information. (Note that all values may not be present though)
When the haystack is a mapping, search tries to find the index connected to the data needle. That is, it tries to lookup the mapping backwards. If needle isn't present in the mapping, zero is returned, and zero_type() will return 1 for this zero.
The callback will receive the signal number as the only argument. See the document for the function 'kill' for a list of signals.
If no second argument is given, the signal handler for that signal is restored to the default handler.
If the second argument is zero, the signal will be completely ignored.
Sort can sort strings, integers and floats in ascending order. Arrays will be sorted first on the first element of each array.
Sort returns its first argument.
Modifiers:
| 0 | Zero pad numbers (implies right justification) |
| ! | Toggle truncation |
| ' ' (space) | pad positive integers with a space |
| + | pad positive integers with a plus sign |
| - | left adjusted within field size (default is right) |
| | | centered within field size |
| = | column mode if strings are greater than field size |
| / | Rough line break (break at exactly field size instead of between words) |
| # | table mode, print a list of '\n' separated word (top-to-bottom order) |
| $ | Inverse table mode (left-to-right order) |
| n | (where n is a number or *) a number specifies field size |
| .n | set precision |
| :n | set field size & precision |
| ;n | Set column width |
| * | if n is a * then next argument is used for precision/field size |
| 'X' | Set a pad string. ' cannot be a part of the pad_string (yet) |
| ~ | Get pad string from argument list. |
| < | Use same arg again |
| ^ | repeat this on every line produced |
| @ | do this format for each entry in argument array |
| > | Put the string at the bottom end of column instead of top |
| _ | Set width to the length of data |
Operators:
| %% | percent |
| %b | signed binary int |
| %d | signed decimal int |
| %o | signed octal int |
| %x | lowercase signed hexadecimal int |
| %X | uppercase signed hexadecimal int |
| %c | char (or short with %2c, %3c gives 3 bytes etc.) |
| %f | float |
| %g | heuristically chosen representation of float |
| %G | like %g, but uses uppercase E for exponent |
| %e | exponential notation float |
| %E | like %e, but uses uppercase E for exponent |
| %F | binary IEEE representation of float (%4F gives single precision, %8F gives double precision.) |
| %s | string |
| %O | any type (debug style) |
| %n | nop |
| %t | type of argument |
| %<modifiers>{format%} | do a format for every index in an array. |
Pike v0.7 release 1 running Hilfe v2.0 (Incremental Pike Frontend)
> int screen_width=70;
Result: 70
> mixed sample;
> write(sprintf("fish: %c\n", 65));
fish: A
Result: 8
> write(sprintf("num: %d\n", 10));
num: 10
Result: 8
> write(sprintf("num: %+10d\n", 10));
num: +10
Result: 16
> write(sprintf("num: %010d\n", 5*2));
num: 0000000010
Result: 16
> write(sprintf("num: %|10d\n", 20/2));
num: 10
Result: 16
> write(sprintf("%|*s\n",screen_width,"THE NOT END"));
THE NOT END
Result: 71
> write(sprintf("%|=*s\n",screen_width, "fun with penguins\n"));
fun with penguins
Result: 71
> write(sprintf("%-=*O\n",screen_width,({ "fish", 9, "gumbies", 2 })));
({ /* 4 elements */
"fish",
9,
"gumbies",
2
})
Result: 426
> write(sprintf("%-=*s\n", screen_width,
"This will wordwrap the specified string within the "+
"specified field size, this is useful say, if you let "+
"users specify their screen size, then the room "+
"descriptions will automagically word-wrap as appropriate.\n"+
"slosh-n's will of course force a new-line when needed.\n"));
This will wordwrap the specified string within the specified field
size, this is useful say, if you let users specify their screen size,
then the room descriptions will automagically word-wrap as
appropriate.
slosh-n's will of course force a new-line when needed.
Result: 355
> write(sprintf("%-=*s %-=*s\n", screen_width/2,
"Two columns next to each other (any number of columns will "+
"of course work) independently word-wrapped, can be useful.",
screen_width/2-1,
"The - is to specify justification, this is in adherence "+
"to std sprintf which defaults to right-justification, "+
"this version also supports center and right justification."));
Two columns next to each other (any The - is to specify justification,
number of columns will of course this is in adherence to std
work) independently word-wrapped, sprintf which defaults to
can be useful. right-justification, this version
also supports center and right
justification.
Result: 426
> write(sprintf("%-$*s\n", screen_width,
"Given a\nlist of\nslosh-n\nseparated\n'words',\nthis option\n"+
"creates a\ntable out\nof them\nthe number of\ncolumns\n"+
"be forced\nby specifying a\nprecision.\nThe most obvious\n"+
"use is for\nformatted\nls output."));
Given a list of slosh-n
separated 'words', this option
creates a table out of them
the number of columns be forced
by specifying a precision. The most obvious
use is for formatted ls output.
Result: 312
> sample = ({"bing","womble","wuff","gul"});
Result: ({ /* 4 elements */
"bing",
"womble",
"wuff",
"gul"
})
> write(sprintf("This will apply the format strings between the\n"
"procent-braces to all elements in the array:\n"
"%{gurksallad: %s\n%}",
sample));
This will apply the format strings between the
procent-braces to all elements in the array:
gurksallad: bing
gurksallad: womble
gurksallad: wuff
gurksallad: gul
Result: 162
> write(sprintf("Of course all the simple printf options "+
"are supported:\n %s: %d %x %o %c\n",
"65 as decimal, hex, octal and a char",
65, 65, 65, 65));
Of course all the simple printf options are supported:
65 as decimal, hex, octal and a char: 65 41 101 A
Result: 106
> write(sprintf("%|*s\n",screen_width, "THE END"));
THE END
Result: 71
> quit
Exiting.
Throws an error if characters not legal in an UTF16 stream are encountered. Valid characters are in the range 0x00000 - 0x10ffff, except for characters 0xfffe and 0xffff.
Characters in range 0x010000 - 0x10ffff are encoded using surrogates.
Throws an error if characters not valid in an UTF8 stream are encountered. Valid characters are in the range 0x00000000 - 0x7fffffff.
If extended is 1, characters in the range 0x80000000-0xfffffffff will also be accepted, and encoded using a non-standard UTF8 extension.
The second syntax does not call the system call time() as often, but is only updated in the backed. (when Pike code isn't running)
The third syntax can be used to measure time more preciely than one second. It return how many seconds has passed since t. The precision of this function varies from system to system.
If useconds is zero, no new alarm is scheduled.
In any event any previously set alarm is canceled.
Throws an error if the stream is not a legal UFT8 byte-stream.
Accepts and decodes the extension used by string_to_utf8(), if extended is 1.
> version();
Result: "Pike v0.7 release 1"
If the argument is not an int, zero will be returned.
Aside from the above functions, which are expected from the Pike binary,
the master object is also expected to provide functions used by Pike
scripts. The current master object adds the following global functions:
There are at least two ways to change the behavior of the master object.
(Except for editing it directly, which would cause other Pike scripts not
to run in most cases.) You can either copy the master object, modify it
and use the command line option -m to load your file instead of
the default master object. However, since there might be more functionality
added to the master object in the future I do not recommend this.
A better way is to write an object that inherits the master and then calls
replace_master with the new object as argument. This should be far more
future-safe. Although I can not guarantee that the interface between Pike
and the master object will not change in the future, so be careful if you
do this.
Let's look an example:
17.1 The master object
Pike is a very dynamic language. Sometimes that is not enough, sometimes you
want to change the way Pike handles errors, loads modules or start scripts.
All this and much more can be changed by modifying the master object.
The master object is a Pike object like any other object, but it is
loaded before anything else and is expected to perform certain things for
the Pike executable. The Pike executable cannot function without a master
object to take care of these things. Here is a list of the methods needed
in the master object:
This example installs a master object which logs run time errors to file
instead of writing them to stderr.
#!/usr/local/bin/pike
class new_master {
inherit "/master";
void create()
{
/* You need to copy the values from the old master to the new */
/* NOTE: At this point we are still using the old master */
object old_master = master();
object new_master = this_object();
foreach(indices(old_master), string varname)
{
/* The catch is needed since we can't assign constants */
catch { new_master[varname] = old_master[varname]; };
}
}
void handle_error(array trace)
{
Stdio.write_file("error log",describe_backtrace(trace));
}
};
int main(int argc, array(string) argv)
{
replace_master(new_master());
/* Run rest of program */
exit(0);
}
A struct svalue has three members:
| type is: | member to use: | notes: |
|---|---|---|
| T_INT | INT_TYPE integer | |
| T_FLOAT | FLOAT_TYPE float_number | |
| T_STRING | struct pike_string *string | |
| T_ARRAY | struct array *array | |
| T_MAPPING | struct mapping *mapping | |
| T_MULTISET | struct multiset *multiset | |
| T_OBJECT | struct object *object | |
| T_PROGRAM | struct program *program | |
| T_FUNCTION | struct callable *efun | If subtype == FUNCTION_BUILTIN |
| T_FUNCTION | struct object *object | If subtype != FUNCTION_BUILTIN |
Of course there are a whole bunch of functions for operating on svalues:
This macro may call Pike code and/or error().
int is_le(struct svalue *a, struct svalue *b);
int is_gt(struct svalue *a, struct svalue *b);
int is_ge(struct svalue *a, struct svalue *b);
A struct pike_string has these members:
If after calling this function you decide that you do not need this string after all, you can simply call free on the returned string to free it. It is also possible to call free_string(end_shared_string(s)) but that would be much less efficient.
A struct array has these members:
void prtypes(struct array *a)
{
INT e;
for(e=0;e<a->size;e++)
printf("Element %d is of type %d\n",e,a->item[e].type);
}
This is the contents of a struct mapping:
Below is an illustration which shows an example of a small mapping with hash table, free list and key-index pairs.
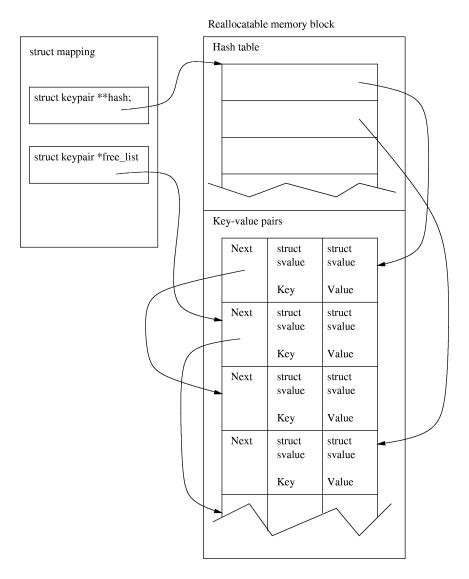
#!/usr/local/bin/pike
mapping records(string:array(string)) = ([
"Star Wars Trilogy" : ({
"Fox Fanfare",
"Main Title",
"Princess Leia's Theme",
"Here They Come",
"The Asteroid Field",
"Yoda's Theme",
"The Imperial March",
"Parade of th Ewoks",
"Luke and Leia",
"Fight with Tie Fighters",
"Jabba the Hut",
"Darth Vader's Death",
"The Forest Battle",
"Finale",
})
]);
void list_records()
{
int i;
array(string) record_names=sort(indices(records));
write("Records:\n");
for(i=0;i<sizeof(record_names);i++)
write(sprintf("%3d: %s\n", i+1, record_names[i]));
}
void show_record(int num)
{
int i;
array(string) record_names=sort(indices(records));
string name=record_names[num-1];
array(string) songs=records[name];
write(sprintf("Record %d, %s\n",num,name));
for(i=0;i<sizeof(songs);i++)
write(sprintf("%3d: %s\n", i+1, songs[i]));
}
void add_record()
{
string record_name=Stdio.Readline()->read("Record name: ");
records[record_name]=({});
write("Input song names, one per line. End with '.' on its own line.\n");
while(1)
{
string song;
song=Stdio.Readline()->read(sprintf("Song %2d: ",
sizeof(records[record_name])+1));
if(song==".") return;
records[record_name]+=({song});
}
}
void save(string file_name)
{
    string name, song;
    Stdio.File o=Stdio.File();

    if(!o->open(file_name,"wct"))
    {
        write("Failed to open file.\n");
        return;
    }

    foreach(indices(records),name)
    {
        o->write("Record: "+name+"\n");
        foreach(records[name],song)
            o->write("Song: "+song+"\n");
    }

    o->close();
}
void load(string file_name)
{
    string name="ERROR";
    string file_contents,line;

    Stdio.File o=Stdio.File();
    if(!o->open(file_name,"r"))
    {
        write("Failed to open file.\n");
        return;
    }

    file_contents=o->read();
    o->close();

    records=([]);

    foreach(file_contents/"\n",line)
    {
        string cmd, arg;
        if(sscanf(line,"%s: %s",cmd,arg))
        {
            switch(lower_case(cmd))
            {
            case "record":
                name=arg;
                records[name]=({});
                break;

             case "song":
                 records[name]+=({arg});
                 break;
            }
        }
    }
}
void delete_record(int num)
{
array(string) record_names=sort(indices(records));
string name=record_names[num-1];
m_delete(records,name);
}
void find_song(string title)
{
string name, song;
int hits;
title=lower_case(title);
foreach(indices(records),name)
{
foreach(records[name],song)
{
if(search(lower_case(song), title) != -1)
{
write(name+"; "+song+"\n");
hits++;
}
}
}
if(!hits) write("Not found.\n");
}
int main(int argc, array(string) argv)
{
string cmd;
while(cmd=Stdio.Readline()->read("Command: "))
{
string args;
sscanf(cmd,"%s %s",cmd,args);
switch(cmd)
{
case "list":
if((int)args)
{
show_record((int)args);
}else{
list_records();
}
break;
case "quit":
exit(0);
case "add":
add_record();
break;
case "save":
    save(args);
    break;

case "load":
    load(args);
    break;
case "delete":
    delete_record((int)args);
    break;

case "search":
    find_song(args);
    break;
        }
    }
}
array break case catch continue default do else float for foreach function gauge if inherit inline int lambda mapping mixed multiset nomask object predef private program protected public return sscanf static string switch typeof varargs void while
| program | ::= | { definition } |
| definition | ::= | import | inheritance | function_declaration | function_definition | variables | constant | class_def |
| import | ::= | modifiers import ( constant_identifier | string ) ";" |
| inheritance | ::= | modifiers inherit program_specifier [ ":" identifier ] ";" |
| function_declaration | ::= | modifiers type identifier "(" arguments ")" ";" |
| function_definition | ::= | modifiers type identifier "(" arguments ")" block |
| variables | ::= | modifiers type variable_names ";" |
| variable_names | ::= | variable_name { "," variable_name } |
| variable_name | ::= | { "*" } identifier [ "=" expression2 ] |
| constant | ::= | modifiers constant constant_names ";" |
| constant_names | ::= | constant_name { "," constant_name } |
| constant_name | ::= | identifier "=" expression2 |
| class_def | ::= | modifiers class [ ";" ] |
| class | ::= | class [ identifier ] "{" program "}" |
| modifiers | ::= | { static | private | nomask | public | protected | inline } |
| block | ::= | "{" { statement } "}" |
| statement | ::= | expression2 ";" | cond | while | do_while | for | switch | case | default | return | block | foreach | break | continue | ";" |
| cond | ::= | if statement [ else statement ] |
| while | ::= | while "(" expression ")" statement |
| do_while | ::= | do statement while "(" expression ")" ";" |
| for | ::= | for "(" [ expression ] ";" [ expression ] ";" [ expression ] ")" statement |
| switch | ::= | switch "(" expression ")" block |
| case | ::= | case expression [ ".." expression ] ":" |
| default | ::= | default ":" |
| foreach | ::= | foreach "(" expression ":" expression6 ")" statement |
| break | ::= | break ";" |
| continue | ::= | continue ";" |
| expression | ::= | expression2 { "," expression2 } |
| expression2 | ::= | { lvalue ( "=" | "+=" | "*=" | "/=" | "&=" | "|=" | "^=" | "<<=" | ">>=" | "%=" ) } expression3 |
| expression3 | ::= | expression4 '?' expression3 ":" expression3 |
| expression4 | ::= | { expression5 ( "||" | "&&" | "|" | "^" | "&" | "==" | "!=" | ">" | "<" | ">=" | "<=" | "<<" | ">>" | "+" | "*" | "/" | "%" ) } expression5 |
| expression5 | ::= | expression6 | "(" type ")" expression5 | "--" expression6 | "++" expression6 | expression6 "--" | expression6 "++" | "~" expression5 | "-" expression5 |
| expression6 | ::= | string | number | float | catch | gauge | typeof | sscanf | lambda | class | constant_identifier | call | index | mapping | multiset | array | parenthesis | arrow |
| number | ::= | digit { digit } | "0x" { digits } | "'" character "'" |
| float | ::= | digit { digit } "." { digit } |
| catch | ::= | catch ( "(" expression ")" | block ) |
| gauge | ::= | gauge ( "(" expression ")" | block ) |
| sscanf | ::= | sscanf "(" expression2 "," expression2 { "," lvalue } ")" |
| lvalue | ::= | expression6 | type identifier | "[" [ lvalue { "," lvalue } [ "," ] ] "]" |
| lambda | ::= | lambda "(" arguments ")" block |
| constant_identifier | ::= | ["."] identifier { "." identifier } |
| call | ::= | expression6 "(" expression_list ")" |
| index | ::= | expression6 "[" expression [ ".." expression ] "]" |
| array | ::= | "({" expression_list "})" |
| multiset | ::= | "(<" expression_list ">)" |
| mapping | ::= | "([" [ expression : expression { "," expression ":" expression } ] [ "," ] "])" |
| arrow | ::= | expression6 "->" identifier |
| parenthesis | ::= | "(" expression ")" |
| expression_list | ::= | [ splice_expression { "," splice_expression } ] [ "," ] |
| splice_expression | ::= | [ "@" ] expression2 |
| type | ::= | ( int | string | float | program | object [ "(" program_specifier ")" ] | mapping [ "(" type ":" type ")" | array [ "(" type ")" ] | multiset [ "(" type ")" ] | function [ function_type ] ) { "*" } |
| function_type | ::= | "(" [ type { "," type } [ "..." ] ")" |
| arguments | ::= | [ argument { "," argument } ] [","] |
| argument | ::= | type [ "..." ] [ identifier ] |
| program_specifier | ::= | string_constant | constant_identifier |
| string | ::= | string_literal { string_literal } |
| identifier | ::= | letter { letter | digit } | "`+" | "`/" | "`%" | "`*" | "`&" | "`|" | "`^" | "`~" | "`<" | "`<<" | "`<=" | "`>" | "`>>" | "`>=" | "`==" | "`!=" | "`!" | "`()" | "`-" | "`->" | "`->=" | "`[]" | "`[]=" |
| letter | ::= | "a"-"z" | "A"-"Z" | "_" |
| digit | ::= | "0"-"9" |
$ gunzip -d Pike-v0.7.1.tar.gz $ tar xvf Pike-v0.7.1.tarNow you have a directory called Pike-v0.7.1. Please read the README file in the new directory since newer versions can contain information not available at the time this book was written.
Now, to compile Pike, the following three commands should be enough.
$ cd Pike-v0.7.1/src $ ./configure --prefix=/dir/to/install/pike $ makeThey will (in order) change directory to the source directory. Configure will then find out what features are available on your system and construct makefiles. You will see a lot of output after you run configure. Do not worry, that is normal. It is usually not a good idea to install Pike anywhere but in /usr/local (the default) since Pike scripts written by other people will usually assume that's where Pike is. However, if you do not have write access to /usr/local you will have to install Pike somewhere else on your system.
After that make will actually compile the program. After compilation it is a good idea to do make verify to make sure that Pike is 100% compatible with your system. Make verify will take a while to run and use a lot of CPU, but it is worth it to see that your compilation was successful. After doing that you should run make install to install the Pike binaries, libraries and include files in the directory you selected earlier.
You are now ready to use Pike.
| top layer |  | |
| bottom layer |  | |
| normal |  | D=(L*aL+S*(1-aL)*aS) / (aL+(1-aL)*aS), aD=(aL+(1-aL)*aS) |
| add |  | D=L+S, apply alpha as "normal" mode |
| subtract |  | D=L-S, apply alpha as "normal" mode |
| multiply |  | D=L*S, apply alpha as "normal" mode |
| divide |  | D=L/S, apply alpha as "normal" mode |
| modulo |  | D=L%S, apply alpha as "normal" mode |
| invsubtract |  | D=S-L, apply alpha as "normal" mode |
| invdivide |  | D=S/L, apply alpha as "normal" mode |
| invmodulo |  | D=S%L, apply alpha as "normal" mode |
| difference |  | D=abs(L-S), apply alpha as "normal" mode |
| max |  | D=max(L,S), apply alpha as "normal" mode |
| min |  | D=min(L,S), apply alpha as "normal" mode |
| bitwise_and |  | D=L&S, apply alpha as "normal" mode |
| bitwise_or |  | D=L|S, apply alpha as "normal" mode |
| bitwise_xor |  | D=L^S, apply alpha as "normal" mode |
| replace |  | D=(L*aL+S*(1-aL)*aS) / (aL+(1-aL)*aS), aD=aS |
| red |  | Dr=(Lr*aLr+Sr*(1-aLr)*aSr) / (aLr+(1-aLr)*aSr), Dgb=Sgb, aD=aS |
| green |  | Dg=(Lg*aLg+Sg*(1-aLg)*aSg) / (aLg+(1-aLg)*aSg), Drb=Srb, aD=aS |
| blue |  | Db=(Lb*aLb+Sb*(1-aLb)*aSb) / (aLb+(1-aLb)*aSb), Drg=Srg, aD=aS |
| replace_hsv |  | Dhsv=(Lhsv*aLrgb+Shsv*(1-aLrgb)*aSrgb) / (aLrgb+(1-aLrgb)*aSrgb), aD=aS |
| hue |  | Dh=(Lh*aLr+Sh*(1-aLr)*aSr) / (aLr+(1-aLr)*aSr), Dsv=Lsv, aD=aS |
| saturation |  | Ds=(Ls*aLg+Ss*(1-aLg)*aSg) / (aLg+(1-aLg)*aSg), Dhv=Lhv, aD=aS |
| value |  | Dv=(Lv*aLb+Sv*(1-aLb)*aSb) / (aLb+(1-aLb)*aSb), Dhs=Lhs, aD=aS |
| color |  | Dhs=(Lhs*aLrg+Shs*(1-aLrg)*aSrg) / (aLrg+(1-aLrg)*aSrg), Dv=Lv, aD=aS |
| darken |  | Dv=min(Lv,Sv), Dhs=Lhs, aD=aS |
| lighten |  | Dv=max(Lv,Sv), Dhs=Lhs, aD=aS |
| saturate |  | Ds=max(Ls,Ss), Dhv=Lhv, aD=aS |
| desaturate |  | Ds=min(Ls,Ss), Dhv=Lhv, aD=aS |
| dissolve |  | i=random 0 or 1, D=i?L:S, aD=i+aS |
| behind |  | D=(S*aS+L*(1-aS)*aL) / (aS+(1-aS)*aL), aD=(aS+(1-aS)*aL); simply swap S and L |
| erase |  | D=S, aD=aS*(1-aL) |
| screen |  | 1-(1-S)*(1-L), apply alpha as "normal" |
| overlay |  | (1-(1-a)*(1-b)-a*b)*a+a*b, apply alpha as "normal" |
| burn_alpha |  | aD=aL+aS, D=L+S; experimental, may change or be removed |
| equal |  | each channel D=max if L==S, 0 otherwise, apply with alpha |
| not_equal |  | each channel D=max if L!=S, 0 otherwise, apply with alpha |
| less |  | each channel D=max if L<S, 0 otherwise, apply with alpha |
| more |  | each channel D=max if L>S, 0 otherwise, apply with alpha |
| less_or_equal |  | each channel D=max if L<=S, 0 otherwise, apply with alpha |
| more_or_equal |  | each channel D=max if L>=S, 0 otherwise, apply with alpha |
| logic_equal |  | logic: D=white and opaque if L==S, black and transparent otherwise |
| logic_not_equal |  | logic: D=white and opaque if any L!=S, black and transparent otherwise |
| logic_strict_less |  | logic: D=white and opaque if all L<S, black and transparent otherwise |
| logic_strict_more |  | logic: D=white and opaque if all L>S, black and transparent otherwise |
| logic_strict_less_equal |  | logic: D=white and opaque if all L<=L, black and transparent otherwise |
| logic_strict_more_equal |  | logic: D=white and opaque if all L>=L, black and transparent otherwise |


